Understanding how to check a circuit breaker is essential for maintaining the safety and functionality of your electrical system. A circuit breaker is crucial in modern electrical systems, designed to protect circuits from overloading and potential fire hazards.
This guide provides detailed instructions on how to check and troubleshoot your circuit breaker, ensuring your home or workplace remains safe and operational.
What is a Circuit Breaker?
A circuit breaker is an automatically operated electrical switch designed to protect an electrical circuit from damage caused by excess current from an overload or short circuit. Its basic function is to interrupt current flow after a fault is detected.
Types of Circuit Breakers
- Miniature Circuit Breaker (MCB): Used for low voltage applications, typically in residential and small commercial settings.
- Molded Case Circuit Breaker (MCCB): Suitable for higher current ratings and industrial applications.
- Ground Fault Circuit Interrupter (GFCI): Provides protection against ground faults, commonly used in wet areas.
- Arc Fault Circuit Interrupter (AFCI): Protects against electrical fires caused by arcing faults.
How Circuit Breakers Work
Circuit breakers detect faults and interrupt the flow of electricity. They are designed to:
- Sense Overload: When the current exceeds the safe limit.
- Sense Short Circuit: When current bypasses the intended load path.
- Interrupt Current: Mechanically open the circuit to stop the flow of electricity.
How to Check Circuit Breaker?
Checking a circuit breaker involves a series of steps to ensure it is functioning correctly and safely. Here’s a detailed guide on how to perform this task:
Safety Precautions
- Turn Off Devices: Before checking a circuit breaker, turn off all devices and appliances connected to the circuit.
- Personal Protection: Wear appropriate personal protective equipment (PPE) such as safety glasses and insulated gloves.
- Use Insulated Tools: Ensure that all tools used are properly insulated to prevent electric shock.
Steps to Check a Circuit Breaker
Visual Inspection:
- Examine the Breaker: Look for any obvious signs of damage, such as burn marks, cracks, or corrosion.
- Check the Panel: Ensure the breaker panel is not damaged and is properly secured.
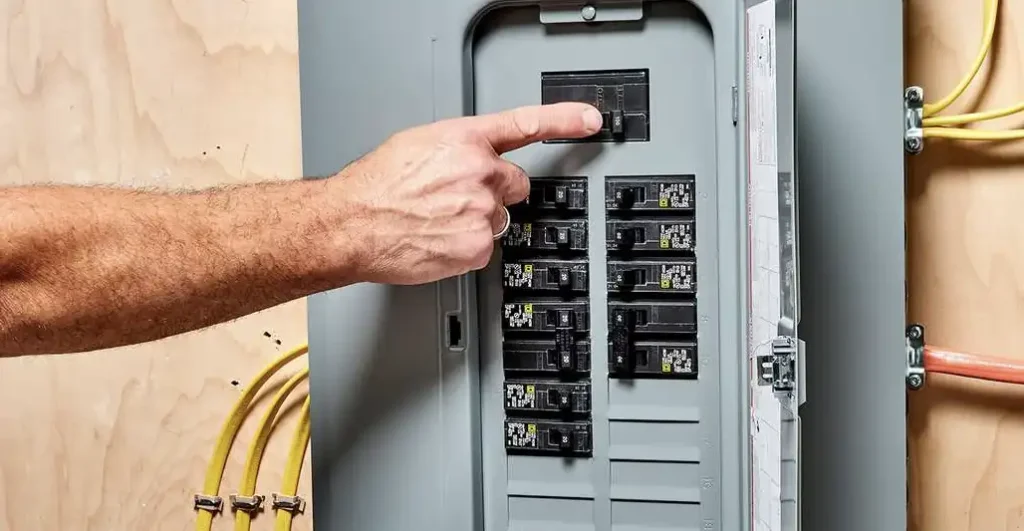
Testing for Tripped Breaker:
- Identify the Breaker: Locate the breaker you suspect might be tripped.
- Check Position: See if the breaker is in the “OFF” position or somewhere between “ON” and “OFF”. A tripped breaker often rests in the middle position.
- Reset the Breaker: To reset, push the breaker fully to the “OFF” position and then back to the “ON” position. If it immediately trips back to “OFF”, there may be a problem in the circuit.
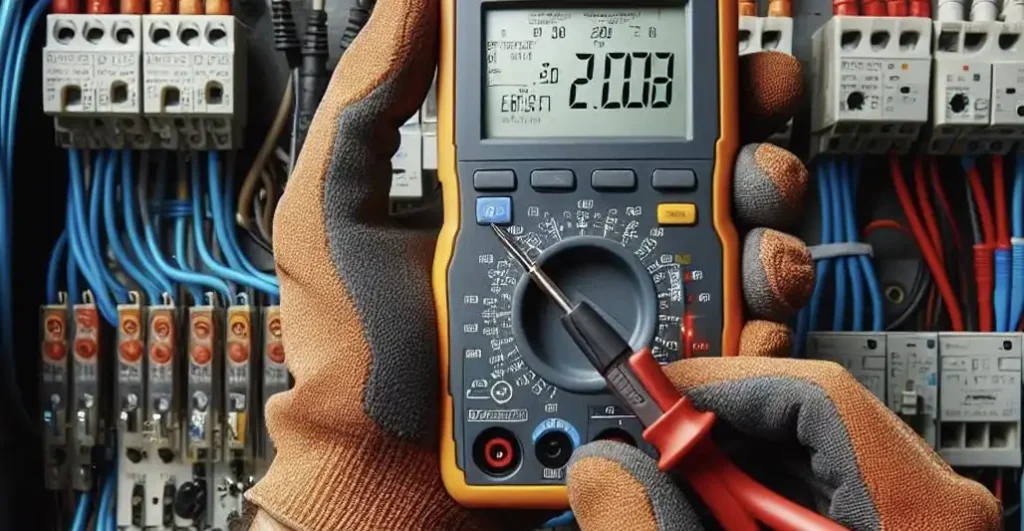
Using a Multimeter:
- Set the Multimeter: Set your multimeter to measure AC voltage.
- Test the Terminals: Carefully touch the multimeter probes to the breaker terminals (the screws where wires are connected).
- For Single-Pole Breakers: Place one probe on the screw terminal and the other on the neutral bar (or ground if applicable). You should read around 120 volts in the US or 230 volts in many other countries.
- For Double-Pole Breakers: Place one probe on each of the two screw terminals. You should read around 240 volts in the US.
- Check for Continuity: If checking for continuity, set the multimeter to the continuity setting, disconnect the wire from the breaker, and place the probes on the breaker terminal and the screw terminal. A beeping sound or a reading on the meter indicates continuity.
Checking Load with a Clamp Meter:
- Clamp Around Wire: Use a clamp meter to measure the current flowing through the wire connected to the breaker.
- Compare Readings: Compare the reading with the breaker’s rated current. A significant difference could indicate a problem.
Thermal Imaging:
- Scan the Breaker: Use a thermal imaging camera to check for hot spots, which can indicate overloading or poor connections.
- Analyze the Image: Excessive heat on a breaker can indicate an internal fault or a loose connection.
Inspecting for Ground Faults or Short Circuits:
- GFCI Breakers: Test Ground Fault Circuit Interrupter (GFCI) breakers by pressing the test button. The breaker should trip; if it doesn’t, it may be faulty.
- Check for Shorts: Disconnect the wire from the breaker and use a multimeter to check for continuity between the wire and ground. Continuity indicates a short circuit.
Advanced Checks
Insulation Resistance Test:
- Use a Megohmmeter: This test checks the insulation resistance of the wires connected to the breaker.
- Follow Manufacturer Guidelines: Use the megohmmeter according to the manufacturer’s instructions to ensure accurate readings.
Breaker Load Testing:
- Professional Equipment: Use specialized breaker testing equipment to simulate a load and verify the breaker’s response.
- Qualified Electrician: This is usually performed by a professional electrician due to the complexity and the risk involved.
When to Replace a Circuit Breaker
- Frequent Tripping: If a breaker frequently trips without an obvious cause, it may need replacement.
- Physical Damage: Visible damage, like burns or cracks, indicates the need for replacement.
- Failure to Reset: If a breaker won’t stay in the “ON” position after resetting, it’s likely faulty.
- No Voltage: Replacement is necessary if no voltage is detected across the breaker terminals despite it being in the “ON” position.
Regular maintenance and checks of circuit breakers are essential for electrical safety and reliability. If in doubt, always consult a qualified electrician to perform these checks and ensure your electrical system is in good condition.
How to Check a Circuit Breaker With a Multimeter
Here are the steps to check a circuit breaker with a multimeter:
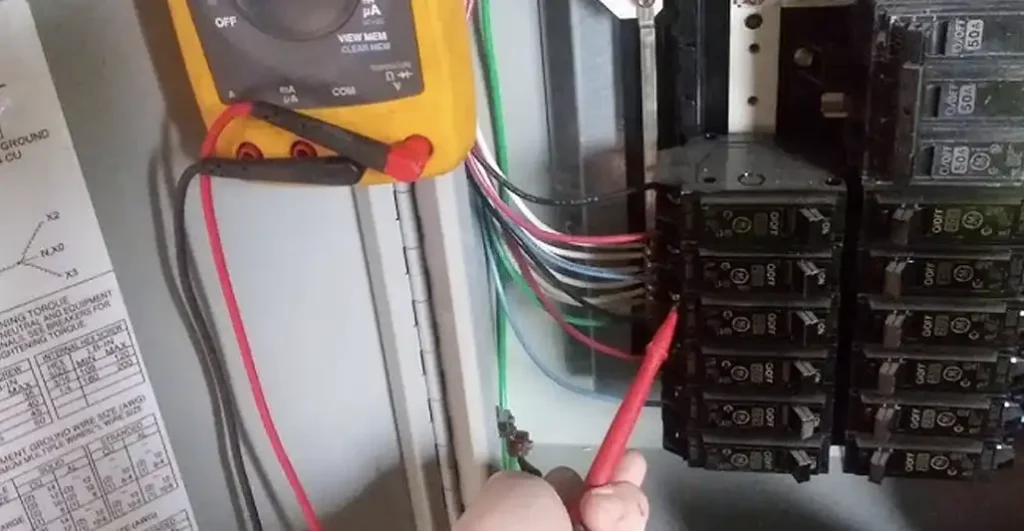
- Set Up the Multimeter: Ensure the multimeter is set to measure AC voltage.
- Turn Off Power: Switch off the power to the circuit you are testing by turning off the main breaker or the specific breaker for that circuit.
- Locate the Breaker: Identify the circuit breaker you want to test and switch it to the “ON” position.
- Access the Breaker Terminals: Remove the cover of the breaker panel to access the terminals of the breaker you are testing.
- Probe Placement: Carefully place one probe of the multimeter on the terminal screw of the circuit breaker.
- Neutral or Ground Reference: For single-pole breakers, place the other probe on the neutral bar in the breaker panel. For double-pole breakers, place it on the other terminal screw.
- Read the Voltage: Read the voltage displayed on the multimeter. It should be around 120 volts for single-pole breakers and 240 volts for double-pole breakers in the US.
- Check Continuity (Optional): If desired, set the multimeter to the continuity setting. Disconnect the wire from the breaker and place one probe on the breaker terminal and the other on the disconnected wire. A beeping sound or a reading on the meter indicates continuity.
- Repeat as Needed: Repeat the process for other breakers if necessary.
- Restore Power: After testing, switch off the breaker and restore power to the circuit by turning on the main breaker or the specific breaker for that circuit.
- Replace Cover: Replace the cover of the breaker panel once testing is complete.
These steps will help you accurately check the functionality of a circuit breaker using a multimeter. Remember to exercise caution and prioritize safety throughout the process. If you’re uncertain or uncomfortable performing these checks, it’s best to seek assistance from a qualified electrician.
How to Check if Circuit Breaker is Bad
To check if a circuit breaker is bad, follow these steps:
- Visual Inspection: Examine the circuit breaker for any visible signs of damage such as burns, cracks, or discoloration. Damaged breakers may indicate internal faults.
- Reset the Breaker: If the circuit breaker has tripped, reset it by switching it to the “OFF” position and then back to the “ON” position. If it trips immediately again, there might be an issue.
- Test with a Multimeter: Use a multimeter to check for voltage across the terminals of the circuit breaker. If there is no voltage present when the breaker is in the “ON” position, it could indicate a problem with the breaker.
- Check for Continuity: Set the multimeter to the continuity setting and test for continuity between the terminals of the circuit breaker. If there is no continuity, the breaker may be faulty.
- Inspect for Heat: Use a thermal imaging camera to check for excessive heat on the circuit breaker. Heat can indicate overloading or internal faults.
- Test Other Breakers: Compare the performance of the suspected bad breaker with other breakers in the panel. If other breakers are functioning properly but the suspect one is not, it may be faulty.
- GFCI and AFCI Testing: If the circuit breaker is a Ground Fault Circuit Interrupter (GFCI) or an Arc Fault Circuit Interrupter (AFCI), test it using the built-in test button. If it fails to trip or reset, it may be defective.
- Professional Inspection: If you are unsure or unable to determine the condition of the circuit breaker, consider contacting a qualified electrician for further inspection and testing.
By following these steps, you can determine if a circuit breaker is bad and needs to be replaced to ensure the safety and proper functioning of your electrical system.
How to Check Amperage on Circuit Breaker
To check the amperage on a circuit breaker, you can follow these steps:
- Turn Off Power: Begin by turning off the power to the circuit you want to check. This ensures your safety while working with electrical components.
- Select a Multimeter: Use a multimeter capable of measuring amperage. Ensure it is set to the appropriate range for the expected current.
- Set Up Multimeter: Insert the red probe into the amperage measurement port on the multimeter. The amperage port is usually labeled with the symbol “A”. Insert the black probe into the common port, usually labeled “COM”.
- Open Circuit: Open the circuit at the point where you want to measure the current. This could involve disconnecting a wire or removing a fuse from the circuit.
- Connect Multimeter: Connect the multimeter in series with the circuit. This means the current flows through the multimeter. Connect the red probe to the side of the circuit that receives power from the source. Connect the black probe to the side that goes to the load (such as a device or appliance).
- Measure Current: With the multimeter properly connected, turn on the power to the circuit. The multimeter will display the amount of current flowing through the circuit in amperes (amps).
- Check Reading: Ensure that the measured current does not exceed the rated amperage of the circuit breaker. Exceeding the rated amperage can lead to overheating and potentially cause a fire hazard.
- Record Results: Take note of the measured amperage for future reference. If the current is consistently near or exceeding the circuit breaker’s rating, it may indicate an overloaded circuit that requires attention.
- Turn Off Power and Disconnect: Once you have completed the measurement, turn off the power to the circuit and disconnect the multimeter.
- Restore Circuit: If necessary, restore the circuit to its original configuration, ensuring all connections are secure.
By following these steps, you can safely and accurately check the amperage on a circuit breaker to ensure it is operating within its specified limits. If you are unsure or uncomfortable performing this task, it is advisable to seek assistance from a qualified electrician.
Conclusion
Checking a circuit breaker is a vital aspect of maintaining electrical safety and reliability in your home or workplace. By following the steps outlined above, you can effectively assess the condition of your circuit breakers and identify any potential issues.
Regular inspection and testing help prevent electrical hazards, equipment damage, and unexpected power outages. Remember to prioritize safety by following proper procedures, using appropriate tools, and seeking professional assistance when needed. You can ensure that your electrical system operates smoothly and securely by staying proactive and vigilant.
Related: 7+ Methods on How to Test a Capacitor With a Multimeter