In our modern world, electricity powers nearly every aspect of our lives. From powering our homes to fueling our industries, electricity is indispensable. However, electrical systems can encounter issues, and a common problem homeowners face is a tripped circuit breaker.
In this comprehensive guide, we’ll delve into the intricacies of fixing a circuit breaker, providing you with the knowledge and tools to address this issue confidently.
Importance of Circuit Breaker Maintenance
Importance of Circuit Breaker Maintenance
Circuit breaker maintenance is a critical aspect of electrical system management, essential for ensuring the safety, reliability, and efficiency of electrical operations. Proper maintenance of circuit breakers prevents electrical hazards, minimizes downtime, and extends the lifespan of the electrical infrastructure. Here are several key reasons underscoring the importance of regular circuit breaker maintenance:
1. Safety Assurance
Circuit breakers are designed to protect electrical systems from overloads, short circuits, and ground faults. Regular maintenance ensures that these protective devices function correctly, thereby reducing the risk of electrical fires, electric shocks, and other hazardous conditions. By maintaining circuit breakers, one can safeguard property and human lives from potential electrical dangers.
2. System Reliability and Performance
A well-maintained circuit breaker contributes to the overall reliability and performance of the electrical system. Regular inspections and servicing help identify and rectify potential issues before they escalate into major problems. This proactive approach ensures uninterrupted power supply and optimal performance of electrical equipment, which is particularly crucial in industrial and commercial settings where downtime can result in significant financial losses.
3. Longevity of Electrical Components
Routine maintenance of circuit breakers extends the lifespan of not only the breakers themselves but also the connected electrical components. Preventive maintenance practices such as cleaning, lubrication, and testing help mitigate wear and tear, reducing the frequency of repairs and replacements. This longevity translates to cost savings in the long term by minimizing the need for expensive emergency interventions and equipment replacements.
4. Compliance with Standards and Regulations
Electrical systems are subject to various industry standards and regulations that mandate regular maintenance and inspection of circuit breakers. Adhering to these regulations ensures compliance with legal requirements, which can prevent penalties and legal complications. Moreover, maintaining compliance demonstrates a commitment to safety and operational excellence, which is particularly important for businesses and institutions.
5. Early Detection of Issues
Regular maintenance facilitates the early detection of potential issues such as corrosion, wear, misalignment, and thermal damage. By identifying and addressing these problems early, maintenance personnel can prevent minor issues from developing into major faults that could compromise the entire electrical system. Early detection also allows for planned maintenance activities, which can be scheduled to minimize disruption to operations.
6. Optimization of Electrical Load Management
Circuit breaker maintenance includes the assessment of electrical load distributions and capacities. Ensuring that circuit breakers are not overloaded and are functioning correctly helps optimize load management across the electrical system. This optimization is crucial for maintaining system balance and preventing unnecessary tripping of breakers, which can lead to operational inefficiencies and inconvenience.
7. Enhanced Efficiency and Cost-Effectiveness
Maintaining circuit breakers enhances the overall efficiency of the electrical system by ensuring that all components operate within their designed parameters. Efficient operation reduces energy consumption and associated costs. Additionally, by avoiding unplanned outages and emergency repairs, businesses can achieve better cost management and allocate resources more effectively.
In conclusion, regular maintenance of circuit breakers is indispensable for maintaining a safe, reliable, and efficient electrical system. It involves a comprehensive approach that includes inspection, testing, cleaning, and timely repairs. By prioritizing circuit breaker maintenance, organizations can protect their assets, ensure compliance, and achieve long-term operational excellence.
Types of Circuit Breakers
- Standard Circuit Breakers: These are the most common type, designed to protect individual circuits in your home.
- Ground Fault Circuit Interrupters (GFCIs): Primarily used in areas where water is present, such as kitchens and bathrooms, GFCIs prevent electric shock by quickly shutting off power when a ground fault is detected.
- Arc Fault Circuit Interrupters (AFCIs): AFCIs detect dangerous arcing faults and can prevent electrical fires by interrupting the circuit.
How to Fix Circuit Breaker?
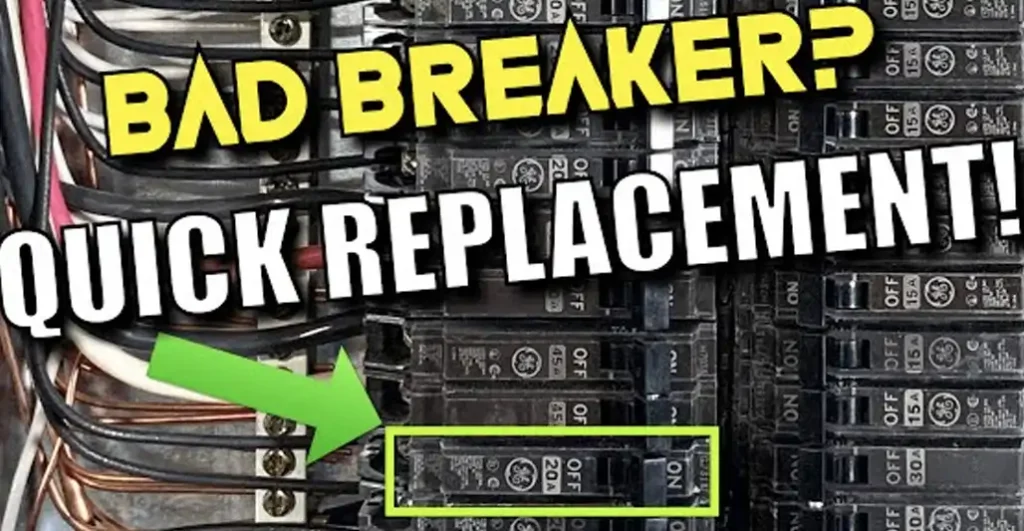
Fixing a circuit breaker involves several steps, from diagnosing the issue to safely restoring power. This guide will walk you through the process to help you address common circuit breaker problems effectively.
Step 1: Identify the Problem
- Check for Power Loss: Determine if specific outlets, lights, or appliances have lost power. This indicates that the circuit connected to those devices may be affected.
- Inspect the Breaker Panel: Locate your home’s breaker panel (usually found in basements, garages, or utility rooms). Open the panel and look for a breaker switch that is in the “off” position or in the middle position between “on” and “off.” This is typically the tripped breaker.
Step 2: Understand the Cause
Before resetting the breaker, it’s essential to understand why it tripped:
- Overload: Too many devices plugged into one circuit can cause an overload.
- Short Circuit: This occurs when a hot wire touches a neutral or ground wire, creating a surge of electricity.
- Ground Fault: Similar to a short circuit, this happens when a hot wire touches a grounded surface.
Step 3: Reset the Breaker
- Switch Off Appliances: Unplug or switch off all appliances and devices connected to the affected circuit. This prevents a sudden overload when the breaker is reset.
- Locate the Tripped Breaker: Identify the breaker that has tripped. It will be the one with the switch in the “off” position or between “on” and “off.”
- Reset the Breaker: Firmly push the breaker switch all the way to the “off” position to ensure it is fully disengaged. Then, push it back to the “on” position until you hear a click, indicating it has reset.
Step 4: Test the Circuit
- Plug In Appliances: After resetting the breaker, plug in one appliance at a time to the affected circuit. This helps determine if a specific device is causing the issue.
- Monitor the Breaker: If the breaker trips again immediately, there may be a more serious issue such as a persistent overload, short circuit, or ground fault. If the breaker stays on, gradually plug in additional devices while monitoring the breaker’s status.
Step 5: Troubleshoot Persistent Issues
If the breaker continues to trip, further investigation is needed:
- Inspect Wiring: Look for signs of damaged or frayed wires in the circuit. This may require removing outlet or switch covers to check the condition of the wiring.
- Test with a Multimeter: Use a multimeter to check for continuity and voltage levels in the circuit. This can help identify if there’s a short circuit or other wiring issues.
- Replace Faulty Components: If any damaged wiring or faulty components are found, they need to be repaired or replaced. This may involve replacing outlets, switches, or even sections of wiring.
Step 6: Consult a Professional
If the breaker still trips after you’ve attempted these steps, it might be time to call a licensed electrician. Professional help is necessary if:
- The Problem Persists: Despite troubleshooting, the breaker continues to trip, indicating a complex issue.
- You’re Uncertain: Electrical work can be dangerous. If you’re unsure about any step, it’s safer to seek professional assistance.
Safety Precautions
- Turn Off Main Power: Before working inside the breaker panel, turn off the main power switch to ensure your safety.
- Use Proper Tools: Insulated tools are a must when working with electrical components to prevent electric shocks.
- Wear Protective Gear: Safety glasses and gloves can protect you from potential hazards while performing electrical work.
How to Fix Microwave Tripping Circuit Breaker
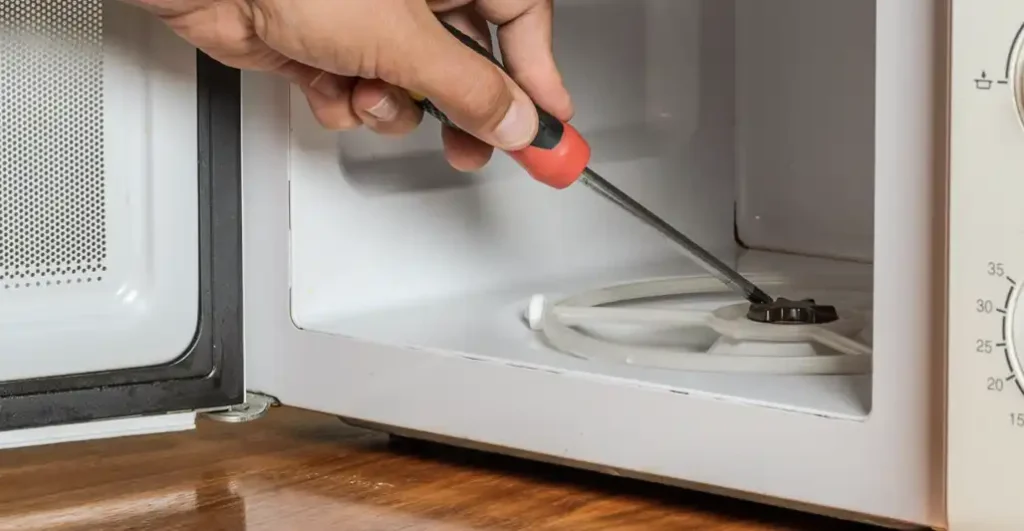
A microwave tripping the circuit breaker can be frustrating, but with some troubleshooting and basic repairs, you can often resolve the issue.
Here is the guide about circuit breaker keeps tripping how to fix
Step 1: Identify the Problem
- Confirm the Tripped Breaker: Check your home’s breaker panel to confirm that the circuit breaker corresponding to the microwave has indeed tripped. It will be in the “off” position or somewhere between “on” and “off.”
Step 2: Determine the Cause
- Overloading: If the microwave shares the circuit with other high-power appliances, such as refrigerators or air conditioners, it may overload the circuit, causing the breaker to trip.
- Faulty Microwave Components: Internal issues within the microwave, such as a defective magnetron or capacitor, can cause excessive power draw and trip the breaker.
- Damaged Power Cord or Outlet: Frayed or damaged power cords or outlets can also lead to electrical shorts and circuit breaker trips.
Step 3: Reset the Breaker
- Switch Off Appliances: Unplug or switch off all appliances connected to the affected circuit to prevent another overload when resetting the breaker.
- Reset the Breaker: Locate the tripped breaker and firmly switch it to the “off” position, then back to the “on” position until you hear a click, indicating it has reset.
Step 4: Test the Microwave
- Plug In the Microwave: After resetting the breaker, plug in the microwave to the outlet.
- Test with a Low-Power Setting: Set the microwave to a low-power setting and run it briefly to see if it operates without tripping the breaker.
- Gradually Increase Power: If the microwave operates without tripping the breaker at low power, gradually increase the power settings to test its functionality at higher levels.
Step 5: Check for Wiring Issues
- Inspect Power Cord and Outlet: Examine the microwave’s power cord for any signs of damage, such as fraying or exposed wires. Similarly, inspect the outlet for damage or loose connections.
- Replace Damaged Components: If you find any damaged wiring, replace the power cord or repair the outlet to ensure proper electrical connections.
Step 6: Consult a Professional
If the microwave continues to trip the circuit breaker after troubleshooting, it may indicate a more significant internal issue that requires professional attention. Contact a licensed electrician or appliance repair technician to diagnose and repair the problem safely.
Safety Precautions
- Turn Off Power: Always turn off the power to the affected circuit before attempting any repairs to prevent electrical shocks.
- Use Insulated Tools: When handling electrical components, use insulated tools to minimize the risk of electrical hazards.
- Avoid Overloading Circuits: Distribute electrical loads evenly across different circuits to prevent overloads and circuit breaker trips.
How Much to Fix Circuit Breaker
The cost of fixing a circuit breaker can vary depending on several factors, including the nature of the problem, the complexity of the repair, and whether professional assistance is required. Here’s a breakdown of potential costs associated with fixing a circuit breaker:
DIY Repairs:
- Minimal Cost: If the issue is minor, such as a tripped breaker due to temporary overload, fixing it yourself may not incur any additional expenses beyond your time and effort.
- Replacement Parts: If the problem lies with a faulty breaker switch or damaged wiring, you may need to purchase replacement parts. The cost of these parts can vary depending on the brand and type of breaker, but generally, they range from $5 to $50 per breaker.
- Tools: Investing in basic electrical tools, such as a multimeter or wire stripper, may be necessary for troubleshooting and repairs. These tools typically range from $10 to $50 each.
Professional Repairs:
- Service Call Fee: Electricians often charge a service call fee to assess the problem and provide an estimate for repairs. This fee typically ranges from $50 to $150, depending on the electrician’s rates and location.
- Labor Costs: The labor cost for fixing a circuit breaker will depend on the complexity of the repair and the electrician’s hourly rate. On average, electricians charge between $50 to $100 per hour for their services.
- Replacement Breakers: If the circuit breaker needs to be replaced, the cost of the new breaker will be added to the total expenses. This cost varies depending on the type and brand of the breaker but generally ranges from $50 to $200.
- Additional Materials: In some cases, additional materials such as wiring, junction boxes, or conduit may be required for the repair, adding to the overall cost.
- Emergency Repairs: If you require emergency repairs outside of regular business hours, expect to pay a premium for the service.
Total Cost:
- DIY: For minor issues that you can fix yourself, the total cost may be minimal, consisting mainly of replacement parts and tools.
- Professional Assistance: If you opt for professional assistance, the total cost can range from a few hundred to several hundred dollars, depending on the extent of the repair and the electrician’s rates.
Factors Affecting Cost:
- Severity of the Problem: Complex issues such as wiring faults or breaker malfunctions may require more extensive repairs, leading to higher costs.
- Location: Labor rates and material costs vary depending on your location and local market conditions.
- Electrician’s Experience: Experienced electricians may charge higher rates but can often complete repairs more efficiently, potentially reducing overall costs.
- Emergency Services: If you require immediate assistance outside of regular business hours, expect to pay higher rates for emergency services.
Conclusion
Fixing a circuit breaker involves a methodical approach to identify, reset, and test the affected circuit. By following these steps, you can often resolve common issues on your own.
However, for persistent or complex problems, always consult a professional electrician to ensure safety and proper repair. Regular maintenance and proper usage of electrical circuits can help prevent breaker trips and ensure the longevity of your electrical system.