Have you ever noticed a bulging or swollen component on your electronic device? This could be a sign of a distended capacitor. While they may seem insignificant, these tiny components play a crucial role in the functioning of your devices.
In this post, we’ll delve into the world of capacitors, explain what causes them to distend, and discuss their essential functions in various electronic circuits.
What Are Distended Capacitors
A distended capacitor has physically bulged or swollen. This is often a sign of internal damage or failure. Capacitors are electronic components that store electrical energy.
When they become damaged, they can overheat and cause a variety of issues, including:
- Malfunction of electronic devices: This can lead to intermittent performance, unexpected shutdowns, or complete failure.
- Electrical fires: In severe cases, a failed capacitor can spark or catch fire, posing a serious safety risk.
What Causes Distended Capacitors?
While we’ve covered the basic reasons for capacitor distension, let’s delve a bit deeper:
Primary Causes:
- Electrolyte Leakage:
- Electrolytic Capacitors: These capacitors use a liquid electrolyte to conduct current between the plates. Over time, the electrolyte can degrade, leak, or evaporate, leading to pressure buildup and distension.
- High Operating Temperatures: Elevated temperatures accelerate the degradation process, making the issue more pronounced.
- Overvoltage:
- Exceeding Voltage Rating: When a capacitor is subjected to voltages higher than its rated capacity, it can cause excessive internal stress, leading to dielectric breakdown and physical deformation.
- Voltage Spikes: Sudden voltage surges, such as those caused by lightning strikes or power surges, can also damage capacitors.
- Aging and Wear:
- Natural Degradation: Like any electronic component, capacitors have a finite lifespan. Over time, the dielectric material can weaken, reducing the capacitor’s ability to store charge.
- Thermal Cycling: Repeated exposure to temperature fluctuations can cause stress on the capacitor’s internal components, leading to degradation and eventual failure.
- Manufacturing Defects:
- Poor Quality Control: Faulty manufacturing processes can result in capacitors with defects that may lead to premature failure.
- Substandard Materials: Using low-quality materials can compromise the capacitor’s performance and lifespan.
Secondary Factors:
- High Ripple Current: Excessive ripple current can cause excessive heating and stress on the capacitor.
- Improper Storage: Storing capacitors in high-humidity environments can accelerate degradation.
Preventive Measures:
- Regular Inspection: Visually inspect electronic devices for signs of capacitor distension.
- Proper Operation: Avoid subjecting devices to extreme temperatures or humidity.10
- Quality Components: Use high-quality capacitors from reputable manufacturers.
- Surge Protection: Employ surge protectors to mitigate the impact of voltage spikes.11
By understanding these causes and taking preventive measures, you can minimize the risk of capacitor failure and prolong the life of your electronic devices.
How Can You Tell if Your Motherboard Has Distended Capacitors?
A distended capacitor is a clear sign of damage or failure. It’s often characterized by a bulging top or a leaking electrolyte.
Here’s how to visually inspect your motherboard for these signs:
- Power Down and Disconnect: Before you start, ensure your computer is completely powered off and unplugged.
- Open the Case: Carefully remove the side panel of your computer case to access the motherboard.
- Visual Inspection:
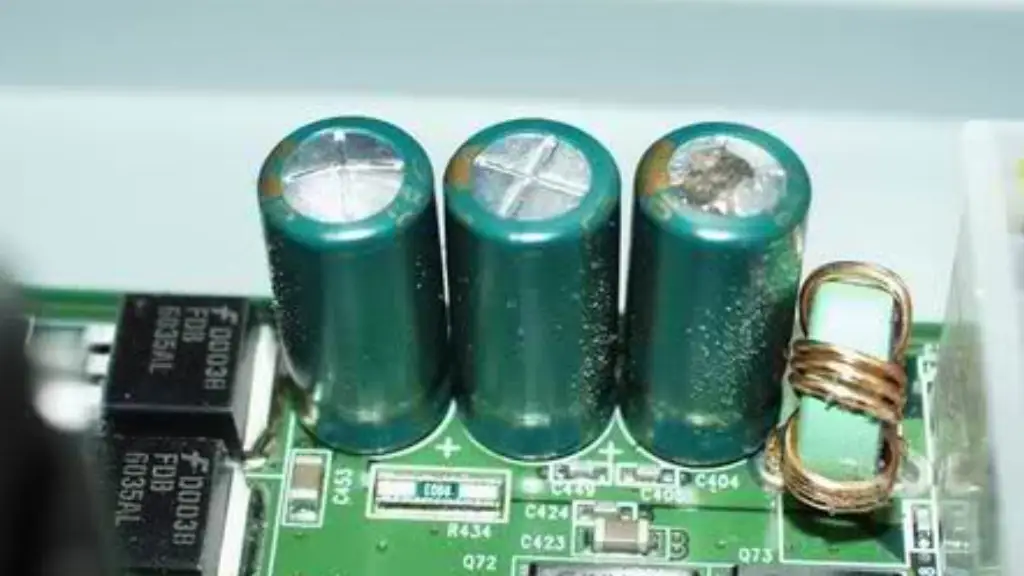
- Bulging Top: Look for capacitors with a rounded or convex top. A healthy capacitor should have a flat top.
- Cracked or Leaking Seal: Check for any cracks or damage to the capacitor’s casing.
- Discoloration or Residue: Look for any unusual discoloration, rust, or residue around the capacitor, which might indicate electrolyte leakage.
Here’s a visual example of a distended capacitor:
If you spot any of these signs, it’s recommended to replace the faulty capacitor. However, this is a delicate task that requires technical expertise and specialized tools. It’s often best to consult a professional technician or consider replacing the entire motherboard.
Remember: Always handle electronic components with care to avoid damage. If you’re unsure about any step, seek professional assistance.
How Can You Tell a Capacitor is Bad?
There are several ways to tell if a capacitor is bad:
Visual Inspection:
- Distension: A bulging top or a leaking electrolyte is a clear sign of a bad capacitor.
- Discoloration or Residue: Unusual discoloration, rust, or residue around the capacitor might indicate internal damage.
- Cracked or Leaking Seal: Cracks or damage to the capacitor’s casing can lead to failure.
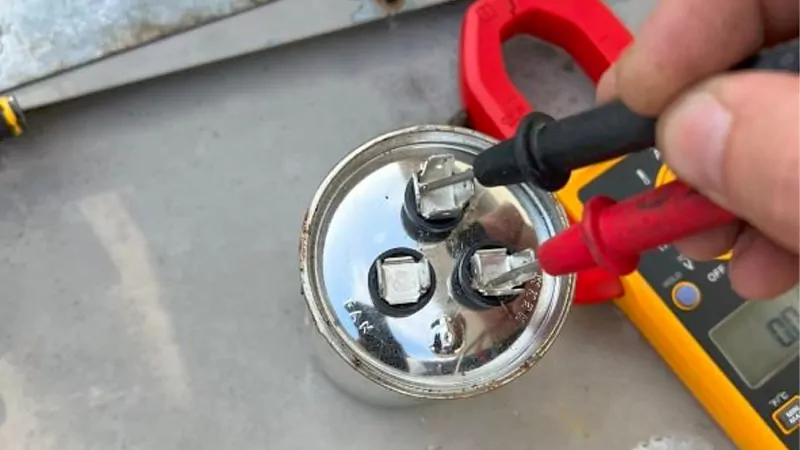
Testing with a Multimeter:
- Capacitance Measurement: Set your multimeter to capacitance mode and measure the capacitor’s capacitance. Compare the reading to the specified value on the capacitor. A significant deviation indicates a problem.
- Resistance Measurement: Set your multimeter to resistance mode and measure the resistance across the capacitor’s leads. A good capacitor will initially show a low resistance, then increase rapidly as it charges. A bad capacitor may show a low resistance or no resistance at all.
Other Signs of a Bad Capacitor:
- Malfunction of Electronic Devices: Intermittent performance, unexpected shutdowns, or complete failure can be symptoms of a bad capacitor.
- Humming Noise: A bad capacitor can cause a humming noise from the device it’s connected to.
- Electrical Fires: In severe cases, a failed capacitor can spark or catch fire.
Important Note:
- Always handle electronic components with care and ensure the device is unplugged before inspecting or testing capacitors.
- If you’re unsure about any step or encounter difficulties, consult a qualified technician.
- Replacing a capacitor can be a delicate task, so it’s often best to seek professional help.
By understanding these signs and taking appropriate action, you can prevent potential electrical hazards and ensure the longevity of your electronic devices.
Distended Capacitors Symptoms
Symptoms of Distended Capacitors
Distended capacitors, or those that have bulged or swollen, are a clear sign of internal damage. Here are some common symptoms associated with faulty capacitors:
Physical Symptoms:
- Visible Bulging: The most obvious sign is a physical bulge or rounded top on the capacitor.
- Cracked or Leaking Seal: The casing may show signs of damage or fluid leakage.
- Discoloration or Residue: The capacitor may appear darker or have a white, powdery residue around it, indicating electrolyte leakage.
Functional Symptoms:
- Intermittent Performance: Devices may experience random freezes, crashes, or restarts.
- Boot Issues: Difficulty booting up or frequent system crashes.
- Strange Noises: Unusual sounds, like high-pitched squeals or humming noises, can indicate a failing capacitor.
- Overheating: Excessive heat generation, especially around the power supply unit (PSU) or motherboard.
- Unexpected Shutdowns: The device may suddenly shut down without warning.
- Erratic Behavior: Inconsistent performance, such as slow response times or unexpected errors.
If you notice any of these symptoms, it’s advisable to inspect your device’s components, particularly the capacitors, for signs of damage. If you find any distended or damaged capacitors, it’s recommended to have them replaced by a qualified technician.
Distended Capacitors in Motherboards
Distended capacitors are a common issue with older motherboards. These components, essential for filtering and stabilizing power, can fail over time, leading to various problems.
Why Do Capacitors Distend?
Several factors can contribute to capacitor distension:
- Age: Over time, capacitors can degrade, especially if exposed to high temperatures or humidity.
- Overvoltage: Exceeding a capacitor’s voltage rating can cause it to overheat and swell.
- Manufacturing Defects: Some capacitors may have defects that lead to premature failure.
- Electrolyte Leakage: In electrolytic capacitors, the electrolyte can degrade and leak, causing pressure buildup and distension.
Symptoms of Distended Capacitors on Motherboards:
- System Instability: Frequent crashes, freezes, or unexpected restarts.
- Boot Problems: Difficulty booting up or long boot times.
- Strange Noises: Unusual sounds like high-pitched squeals or humming noises.
- Overheating: Excessive heat, especially around the power supply unit (PSU) or motherboard.
- Blue Screen of Death (BSOD): Frequent system crashes with a blue screen error.
What to Do About Distended Capacitors:
- Professional Repair: The safest and most reliable method is to have a professional technician replace the faulty capacitors.
- DIY Repair: If you’re experienced with electronics, you can attempt to replace the capacitors yourself. However, this requires technical skills and proper tools. Always exercise caution and discharge any remaining power before working on the motherboard.
- Motherboard Replacement: In severe cases, replacing the entire motherboard might be necessary.
Note: Replacing capacitors is a delicate process that requires precision and knowledge of electronics. If you’re unsure about your abilities, it’s strongly recommended to seek professional help to avoid damaging your motherboard.
Preventive Measures:
- Proper Cooling: Ensure adequate airflow to prevent overheating.
- Surge Protection: Use a surge protector to protect your system from power surges.
- Regular Maintenance: Clean your system regularly to remove dust and debris.
By understanding the causes and symptoms of distended capacitors, you can take proactive steps to maintain the health and longevity of your computer.
How to Fix Distended Capacitors
Disclaimer: Replacing capacitors can be a delicate process that requires technical expertise and specialized tools. If you’re unsure about your abilities, it’s highly recommended to consult a professional technician.
If you’re confident in your skills and have the necessary tools, here’s a general guide:
Tools and Materials:
- Soldering iron
- Solder wick
- Desoldering pump
- Flux
- Replacement capacitors with the same voltage and capacitance ratings
- Isopropyl alcohol
- Cotton swabs
Steps to fix distended capacitors in the following:
- Power Down and Discharge: Ensure the device is completely powered off and unplugged. Discharge any remaining charge from the capacitors using a high-resistance resistor or a specialized discharge tool.
- Identify the Faulty Capacitor: Visually inspect the motherboard for bulging or leaking capacitors. Note their voltage and capacitance ratings.
- Prepare the Work Area: Clean the area around the capacitor with isopropyl alcohol to remove any residue or corrosion.
- Desolder the Old Capacitor: Use a soldering iron to heat the solder joints and remove the old capacitor. Be careful not to damage the surrounding components.
- Clean the Pads: Use solder wick or a desoldering pump to remove any excess solder from the pads. Clean the pads with isopropyl alcohol to ensure a good connection.
- Install the New Capacitor: Align the new capacitor with the correct polarity and solder its leads to the pads. Ensure a strong and clean solder joint.
- Clean Up: Clean any remaining flux or solder residue with isopropyl alcohol.
- Test the Device: Carefully reassemble the device and power it on. Monitor for any unusual behavior or signs of further damage.
Important Considerations:
- Polarity: Ensure that the new capacitor is installed with the correct polarity. Incorrect polarity can lead to damage.
- Heat Sink: If the original capacitor had a heat sink, ensure the replacement capacitor also has one or is installed in a way that allows for adequate heat dissipation.
- ESD Protection: Take appropriate ESD (Electrostatic Discharge) precautions to protect delicate electronic components.
- Component Selection: Choose high-quality replacement capacitors from reputable manufacturers.
Remember, capacitor replacement is a technical task. If you’re unsure about any step or encounter difficulties, it’s best to seek professional help.
Conclusion
Distended capacitors are a common issue in electrical appliances, often signaling a potential failure. Understanding their function and recognizing the signs of distension can help you take proactive steps to prevent electrical hazards and costly repairs.
By being aware of these factors, you can ensure the longevity and safety of your electrical devices.
Need high-quality capacitors for your next project? Contact us today to explore our extensive range of wholesale capacitors. Our products are rigorously tested and designed to meet the highest industry standards.