In the field electrical work, proper wiring of a circuit breaker panel is crucial for the safety and functionality of any building. Whether you’re a seasoned electrician or a DIY enthusiast, understanding the steps involved in this process is essential.
In this guide, we’ll walk you through the 11 steps necessary to wire a circuit breaker panel correctly.
Tools You’ll Need For Circuit Breaker Wiring
Before diving into the wiring process, it’s important to gather the necessary tools:
- Wire cutters
- Wire strippers
- Screwdrivers (both flathead and Phillips)
- Voltage tester
- Wire nuts
- Electrical tape
- Circuit breaker panel
How to Wire a Circuit Breaker
Let’s dive deeper into each step of wiring a circuit breaker in the following:
Step 1: Plan the Circuit
Before you begin any wiring project, it’s essential to plan out the circuit thoroughly. Consider the intended purpose of the circuit, such as powering lights, outlets, or specific appliances. Determine the locations of switches, outlets, and fixtures where you’ll need electrical connections. Additionally, calculate the electrical load that the circuit will bear to ensure it won’t overload. Planning helps you determine the types and lengths of wires you’ll need and ensures a safe and efficient electrical system.
Step 2: Install Electrical Boxes
Electrical boxes provide housing for electrical connections and protect them from damage. Choose the appropriate size and type of electrical box based on your project needs and local building codes. Install electrical boxes securely in the wall or ceiling, ensuring they are flush with the surface and properly supported. Use screws or nails to attach the boxes to framing members, and ensure they are positioned at the correct height and orientation for switches, outlets, or fixtures.
Step 3: Run Cables to Electrical Boxes
Once the electrical boxes are in place, run electrical cables from the breaker box to each box location. Carefully route the cables through walls, ceilings, or floors, avoiding sharp bends or kinks that could damage the wires. Use cable staples, straps, or clamps to secure the cables to framing members and maintain proper spacing from other utilities, such as plumbing or HVAC systems. Leave sufficient slack in the cables at each box location to facilitate connections.
Step 5: Run Cable to the Breaker Box
After running cables to all the electrical boxes, route the cables to the breaker box. Identify the entry point for the cables into the breaker box and ensure they are properly secured and protected from damage. Leave enough slack in the cables inside the breaker box to allow for easy connections to the circuit breakers.
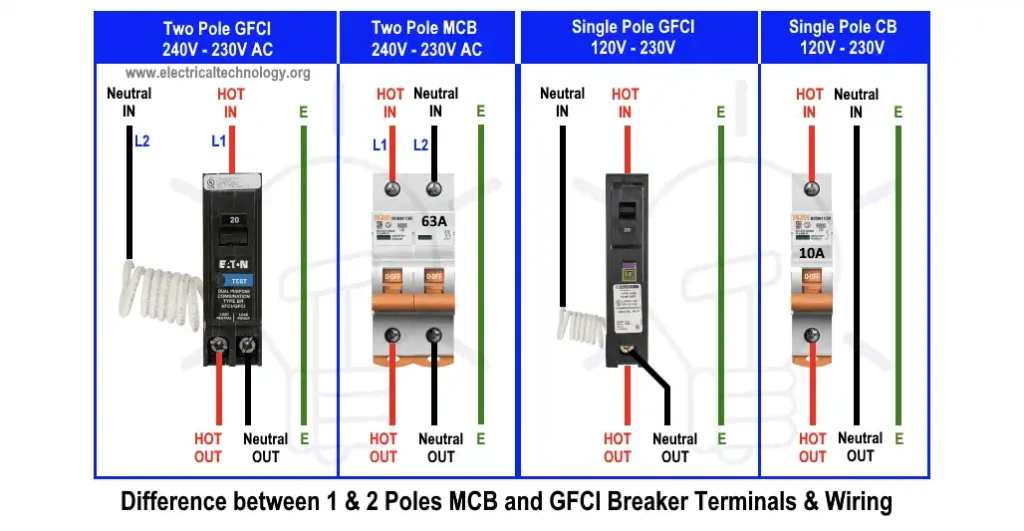
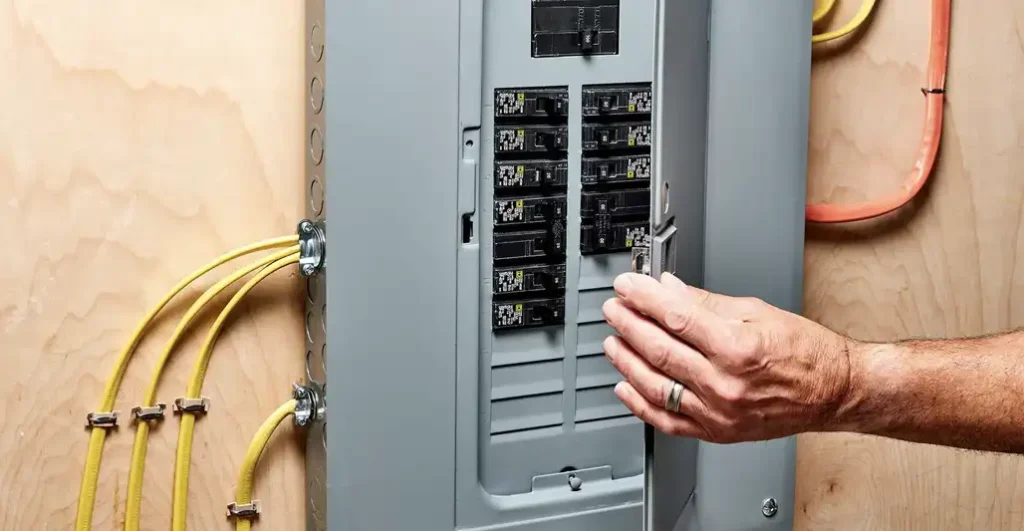
Step 6: Wire the New Circuit Breaker
Before wiring the new circuit breaker, turn off the main power supply to the breaker box to ensure safety. Remove the cover from the breaker box to access the interior. Begin by connecting the neutral wire from the new circuit to the neutral bar or bus in the breaker box. Similarly, connect the ground wire from the new circuit to the grounding bar or bus.
Next, identify an available slot in the breaker box for the new circuit breaker and insert the hot wire from the new circuit into the terminal on the breaker. Tighten the screw to secure the connection. Once the wires are connected, carefully insert the circuit breaker into the designated slot in the breaker box and press firmly until it snaps into place.
Step 7: Test the Circuit
After wiring the new circuit breaker, turn the main power supply back on and test the circuit to ensure everything is working correctly. Use a voltage tester to check for power at the outlets, switches, or fixtures connected to the circuit. Test each component of the circuit individually to verify proper functionality and troubleshoot any issues that may arise.
By following these steps carefully and adhering to electrical codes and safety guidelines, you can wire a new circuit breaker safely and effectively. Always consult a qualified electrician if you’re unsure about any aspect of the process or if you encounter any difficulties. Safety should always be the top priority when working with electricity.
Tips for Wiring Circuit Breakers
Here are some tips for wiring circuit breakers:
- Plan Your Circuit Carefully: Before starting any wiring project, take the time to plan out the circuit thoroughly. Consider the intended use of the circuit, the locations of outlets, switches, and fixtures, and the electrical load it will carry. Proper planning helps ensure a safe and efficient electrical system.
- Use the Right Size Breaker: Make sure to use circuit breakers that are appropriately sized for the circuit and the electrical load it will bear. Undersized breakers can trip frequently and may not provide adequate protection, while oversized breakers can pose a fire hazard.
- Label Your Breakers: To make it easier to identify and troubleshoot circuits in the future, label each circuit breaker in the breaker box with its corresponding circuit. Use a permanent marker or label maker to clearly mark the breaker’s function or location.
- Follow Electrical Codes and Regulations: Always adhere to local electrical codes and regulations when wiring circuit breakers. These codes are in place to ensure safety and compliance with industry standards. If you’re unsure about any aspect of the wiring process, consult a qualified electrician.
- Properly Strip and Secure Wires: When connecting wires to circuit breakers, ensure that they are properly stripped and secured. Use wire strippers to remove the appropriate amount of insulation from the wire ends, and tighten the terminal screws securely to make reliable connections. Avoid leaving excess wire length inside the breaker box, as this can create a safety hazard.
- Test Your Circuits: Once the wiring is complete, test each circuit to ensure proper functionality. Use a voltage tester to verify that power is reaching outlets, switches, and fixtures as expected. Test both the hot and neutral wires to ensure proper wiring and polarity.
- Install GFCI and AFCI Breakers Where Required: In areas where electrical safety is a concern, such as kitchens, bathrooms, and outdoor spaces, consider installing ground fault circuit interrupter (GFCI) or arc fault circuit interrupter (AFCI) breakers. These specialized breakers provide additional protection against electrical shocks and fires caused by ground faults or arc faults.
- Keep the Breaker Box Accessible: Ensure that the breaker box is easily accessible and not obstructed by furniture, storage, or other objects. In the event of an electrical emergency or tripped breaker, quick access to the breaker box is essential for safety and troubleshooting.
- Label Individual Circuits: In addition to labeling the circuit breakers in the breaker box, consider labeling individual outlets, switches, and fixtures to indicate which circuit they are connected to. This makes it easier to identify and isolate specific circuits when performing maintenance or repairs.
- Regularly Inspect and Maintain Your Electrical System: Periodically inspect your electrical system for signs of wear, damage, or overheating. Check for loose connections, frayed wires, or other potential hazards. Keep the breaker box clean and free of dust or debris, and promptly address any issues that arise to ensure the continued safety and reliability of your electrical system.
Circuit Breaker Wire Size Chart
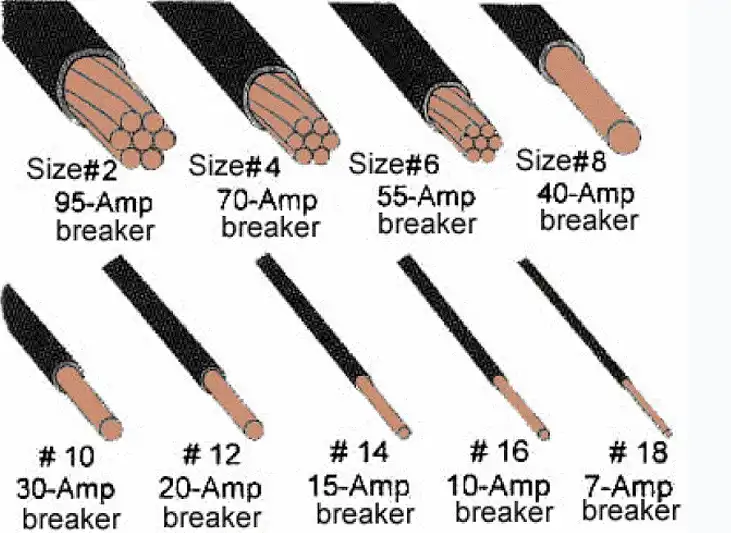
Here’s a basic circuit breaker wire size chart based on common wire gauges and corresponding ampacity ratings:
- 14 AWG: Suitable for circuits with a maximum of 15 amps.
- 12 AWG: Suitable for circuits with a maximum of 20 amps.
- 10 AWG: Suitable for circuits with a maximum of 30 amps.
- 8 AWG: Suitable for circuits with a maximum of 40 amps.
- 6 AWG: Suitable for circuits with a maximum of 55 amps.
- 4 AWG: Suitable for circuits with a maximum of 70 amps.
- 2 AWG: Suitable for circuits with a maximum of 95 amps.
- 1 AWG: Suitable for circuits with a maximum of 110 amps.
- 1/0 AWG: Suitable for circuits with a maximum of 125 amps.
- 2/0 AWG: Suitable for circuits with a maximum of 145 amps.
- 3/0 AWG: Suitable for circuits with a maximum of 165 amps.
- 4/0 AWG: Suitable for circuits with a maximum of 200 amps.
It’s important to note that these are general guidelines, and specific installations may have different requirements based on factors such as the type of wiring (copper or aluminum), the length of the circuit, and local electrical codes. Always consult a qualified electrician or refer to the National Electrical Code (NEC) for precise wire size recommendations for your specific application.
Here’s a table depicting the common wire gauges and corresponding ampacity ratings for circuit breaker wiring:
| Wire Gauge (AWG) | Maximum Ampacity |
|---|---|
| 14 | 15 |
| 12 | 20 |
| 10 | 30 |
| 8 | 40 |
| 6 | 55 |
| 4 | 70 |
| 2 | 95 |
| 1 | 110 |
| 1/0 | 125 |
| 2/0 | 145 |
| 3/0 | 165 |
| 4/0 | 200 |
This table provides a quick reference for selecting the appropriate wire gauge based on the maximum ampacity required for your circuit. Keep in mind that these ratings are general guidelines, and specific installations may have different requirements based on various factors. Always consult a qualified electrician or refer to local electrical codes for precise wire size recommendations.
Conclusion
In conclusion, wiring circuit breakers is a fundamental aspect of electrical installation and maintenance. By following proper procedures and guidelines, you can ensure the safety, efficiency, and reliability of your electrical system. Start by carefully planning the circuit layout and selecting the appropriate wire gauge based on the intended load. Install electrical boxes securely and route cables neatly to prevent damage and ensure accessibility for future maintenance.
When wiring circuit breakers, make sure to use the correct size breaker for the circuit and make secure connections to the neutral and ground bars in the breaker box. Regular inspection and maintenance of your electrical system are essential for identifying and addressing any issues promptly. By adhering to safety standards and best practices, you can wire circuit breakers effectively and maintain a safe and functional electrical system for your home or building.