Wiring a capacitor might seem daunting, but with the right knowledge and guidance, it becomes a manageable task. Whether you’re a DIY enthusiast or a professional, understanding the intricacies of capacitor wiring is crucial for various electrical projects.
In this guide, we’ll delve into every aspect of how to wire a capacitor, from the basics to advanced techniques, ensuring you have the expertise needed to tackle any wiring endeavor.
What is a Capacitor?
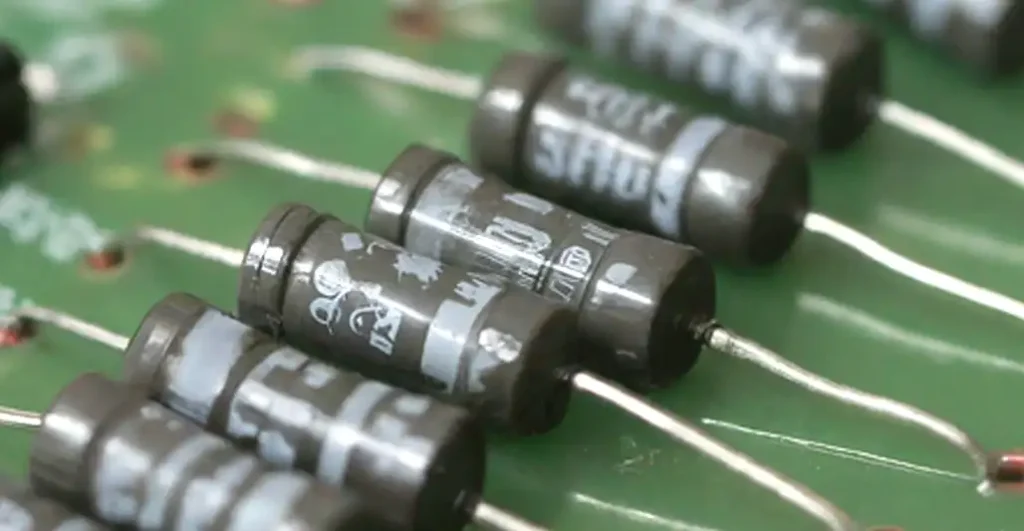
A capacitor is an electronic component that stores electrical energy in an electric field. It consists of two conductive plates separated by an insulating material known as a dielectric. Capacitors come in various types and sizes, each serving specific functions in electrical circuits.
Types of Capacitors
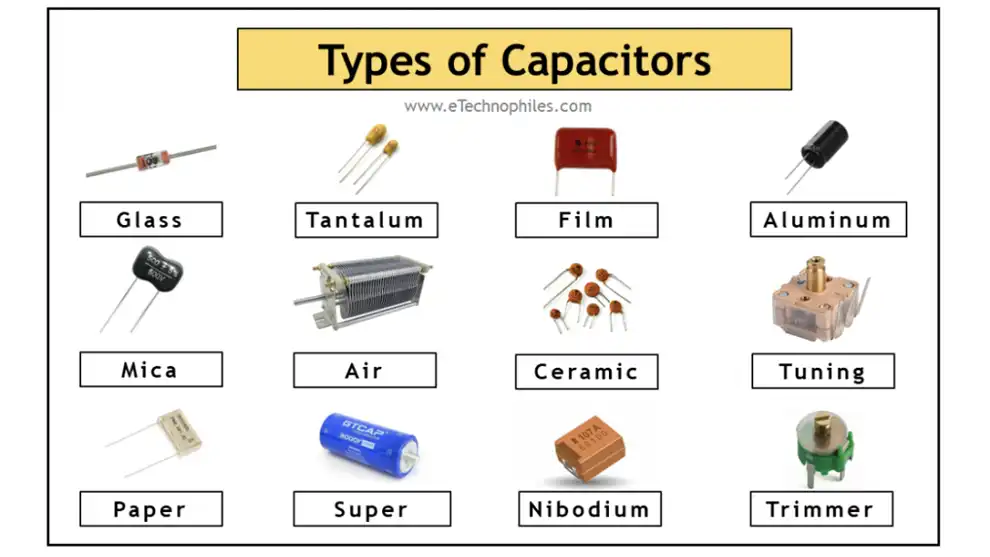
Electrolytic Capacitors
- Description: Electrolytic capacitors are polarized capacitors known for their high capacitance and ability to store large amounts of electrical charge.
- Applications: Commonly used in power supply circuits, audio amplifiers, and other applications requiring high capacitance.
- Advantages: High capacitance values, compact size, and relatively low cost.
- Disadvantages: Limited shelf life, sensitivity to temperature and voltage fluctuations, and potential leakage if operated outside specified parameters.
Ceramic Capacitors
- Description: Ceramic capacitors are non-polarized capacitors made of ceramic materials with a thin layer of metal electrodes.
- Applications: Widely used in timing circuits, filters, and decoupling applications due to their stability and reliability.
- Advantages: Stable capacitance over a wide range of temperatures and frequencies, low losses, and high reliability.
- Disadvantages: Limited capacitance range compared to electrolytic capacitors, and susceptibility to microphonic effects.
Film Capacitors
- Description: Film capacitors consist of thin plastic films with metal electrodes deposited on either side, wound into a cylindrical or rectangular shape.
- Applications: Ideal for audio circuits, high-frequency applications, and precision timing circuits.
- Advantages: High precision, low losses, and excellent stability over a wide range of temperatures and frequencies.
- Disadvantages: Larger physical size compared to ceramic capacitors, higher cost, and limited availability of high-capacitance values.
These are the primary types of capacitors commonly used in electronic circuits, each offering unique characteristics suited to specific applications.
Safety Precautions Before Wiring a Capacitor
Before You Begin
Prioritize safety when working with electrical components. Before wiring a capacitor, ensure the following safety measures:
- Power Off: Always disconnect the power source before handling capacitors to prevent electric shocks.
- Discharge Capacitors: Capacitors can store electrical charge even when disconnected. Use a discharge tool to safely discharge capacitors before handling them.
- Insulation: Wear insulated gloves and safety goggles to protect yourself from electrical hazards.
Tools and Materials Required
Essential Tools
To wire a capacitor effectively, you’ll need the following tools:
- Soldering Iron: For soldering capacitor leads to circuit boards.
- Wire Strippers: To strip insulation from wires for proper connection.
- Multimeter: For measuring capacitance and verifying connections.
- Screwdrivers: Various screwdrivers for opening electronic devices and tightening connections.
Materials
Gather the following materials before starting the wiring process:
- Capacitors: Select capacitors suitable for your project requirements, considering capacitance and voltage ratings.
- Solder: High-quality solder for secure connections.
- Insulating Materials: Heat shrink tubing or electrical tape to insulate connections.
- Solder Flux: Helps improve solder flow and joint quality.
1.Wire Capacitors
These are simple capacitors with two terminals, typically labeled “+” and “-” or unpolarized for AC use.
Example: CBB61 capacitor 2 wire.
Applications: Ceiling fans or exhaust fans.
Wiring: Follow the 2-wire capacitor wiring diagram provided by the manufacturer.
2.Wire Capacitors
Common in fans and AC systems for run or start functions.
Example: 3-wire fan capacitor, CBB61 capacitor 3 wire.
Wiring: Connect the wires as per the diagram; typically, the three wires are “Common,” “Fan,” and “Herm” (Hermetic compressor).
3.Wire Capacitors
Found in more complex systems like AC units and heavy-duty fans.
Example: 4-wire fan capacitor, CBB61 capacitor 4 wire.
Wiring: Follow the 4-wire capacitor wiring diagram. Ensure the “Common,” “Fan,” “Compressor,” and sometimes an additional “Herm” wire are properly connected.
4.Wire Capacitors
Example: CBB61 capacitor 5 wire.
Applications: Multi-functional units needing separate circuits for fan and compressor.
Wiring: Refer to the 5-wire capacitor wiring diagram.
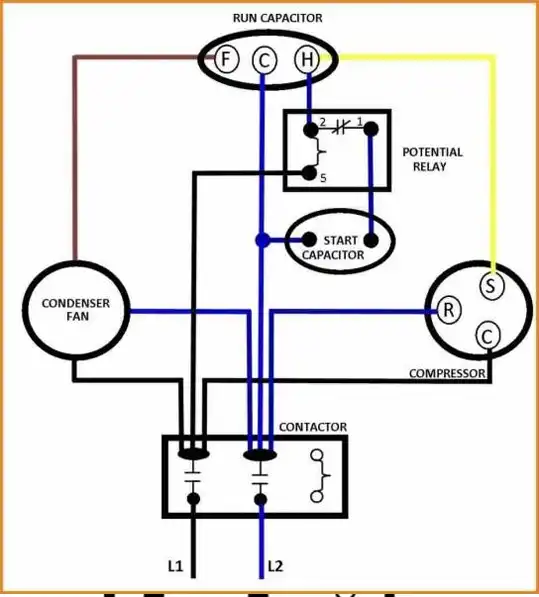
Key Wiring Diagrams
AC Dual Capacitor Wiring Diagram
Used in HVAC systems.
Connect the “C” (Common), “HERM” (Hermetic compressor), and “FAN” terminals to their respective wires.
Example: AC capacitor yellow wire, AC unit capacitor wire colors.
Fan Capacitor Wiring
Example: 3-wire fan capacitor or CBB61 4 wire fan capacitor.
Ensure the fan wire connects to the correct terminal to avoid malfunction.
Exhaust Fan Wiring with Capacitor
Example: 3 wire exhaust fan wiring diagram with capacitor.
Typically connects the motor, power, and capacitor terminals for proper operation.
Series and Parallel Capacitor Wiring
Capacitors in Series
Used to increase the voltage capacity while reducing the overall capacitance.
Example: How to wire capacitors in series.
Capacitors in Parallel
Used to increase the overall capacitance while keeping the voltage the same.
Example: How to wire capacitors in parallel.
Special Applications
Hard Start Capacitors
Provides an extra boost to motors during startup.
Example: How to wire a hard start capacitor.
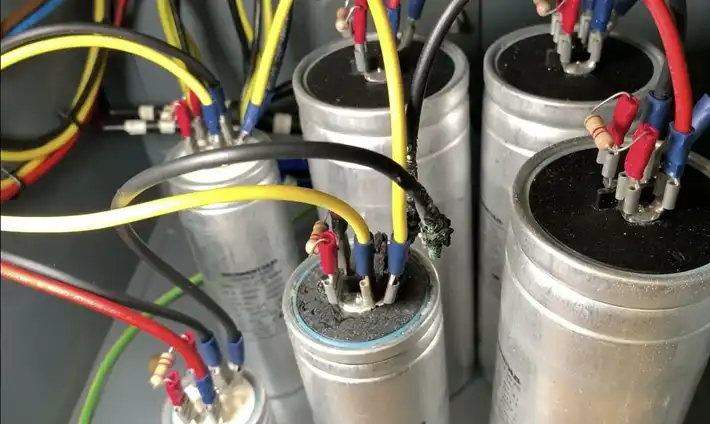
Capacitor Banks
Used for power factor correction.
Example: How to wire a capacitor bank.
Wiring Capacitors to Amplifiers
Common wire colors include yellow, blue, and black.
Example: AC capacitor wire color code, capacitor wire colors.
Connection Points
Capacitors are wired to amplifiers to stabilize voltage supply.
Example: How to wire a capacitor to an amp, how to wire capacitors in parallel.
Important Tips for Wiring Capacitors
How to Wire a Capacitor Step by Step
Let’s walk through the process of wiring a capacitor step by step:
Step 1: Identify Capacitor Leads
- Description: Before beginning the wiring process, it’s essential to identify the leads of the capacitor.
- Instructions: Examine the capacitor closely and locate the two leads. One lead will be longer than the other, indicating polarity. The longer lead is typically the positive (+) terminal, while the shorter lead is the negative (-) terminal.
Step 2: Prepare the Circuit
- Ensure the circuit where the capacitor will be installed is powered off and disconnected from any power source.
- Identify the connection points in the circuit where the capacitor will be wired. Use wire strippers to carefully strip insulation from the wires at these connection points, exposing the conductive metal.
Step 3: Connect the Capacitor
- Solder the capacitor leads to the designated connection points in the circuit.
- With the circuit prepared, solder the capacitor leads to the appropriate connection points, ensuring proper polarity. Connect the positive lead of the capacitor to the positive terminal and the negative lead to the negative terminal. Use a soldering iron and high-quality solder for secure connections.
Step 4: Insulate Connections
- After soldering, insulate the connections to prevent short circuits and ensure safety.
- Once the capacitor leads are securely soldered to the circuit, insulate the connections using heat shrink tubing or electrical tape. Ensure that no exposed metal or wires are visible to prevent accidental contact and short circuits.
Step 5: Testing and Troubleshooting
- Verify the functionality of the wired capacitor and troubleshoot any potential issues.
- Use a multimeter to measure the capacitance of the wired capacitor and verify that it matches the specified value. Power on the circuit and conduct a functionality test to ensure the capacitor operates correctly within the circuit. If the circuit fails to function properly, troubleshoot potential issues such as loose connections, reversed polarity, or damaged components.
By following these step-by-step instructions, you can effectively wire a capacitor into an electronic circuit, ensuring optimal performance and safety.
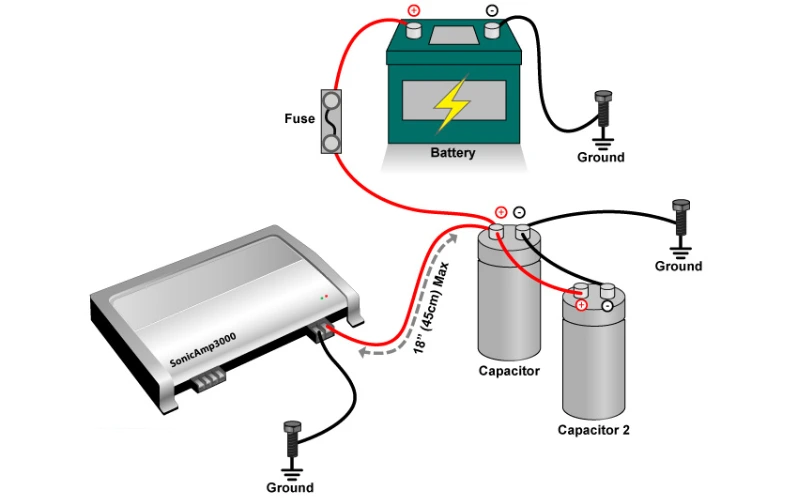
How to Wire a Capacitor to an Amp
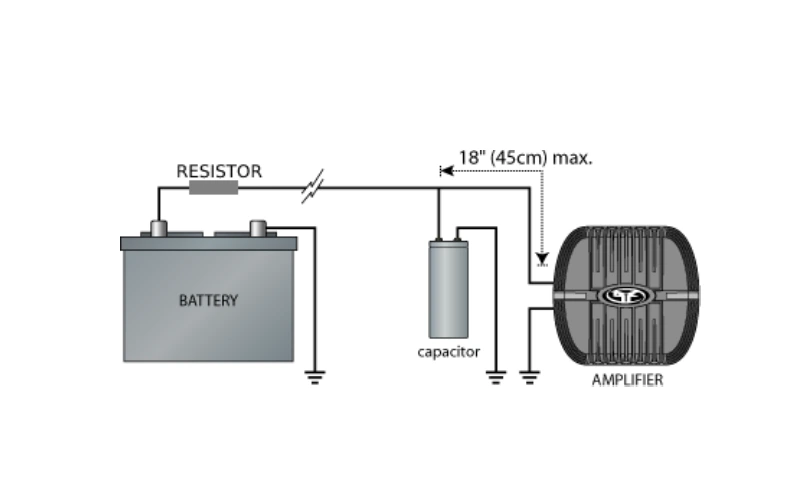
Wiring a capacitor to an amp is a straightforward process that can enhance the performance of your audio system. Here’s a simple guide on how to do it:
- Identify Capacitor Leads: Before starting, locate the positive (+) and negative (-) leads of the capacitor. The positive lead is typically longer than the negative lead.
- Prepare the Amp: Ensure the amp is turned off and disconnected from any power source. Identify the power input terminals on the amp where the capacitor will be connected.
- Connect Positive Lead: Attach the positive lead of the capacitor to the positive terminal of the amp’s power input. This terminal is usually labeled as “+12V” or “BATT.”
- Connect Negative Lead: Connect the negative lead of the capacitor to the ground terminal of the amp. The ground terminal is often labeled as “GND” or “-” and is usually connected to the vehicle’s chassis for a car audio system.
- Insulate Connections: After making the connections, insulate them using electrical tape or heat shrink tubing to prevent any short circuits.
- Secure Placement: Securely mount the capacitor in a location within the vehicle where it won’t interfere with other components and where it can dissipate heat effectively.
- Test the System: Once everything is connected, power on the amp and test the audio system to ensure everything is working correctly. You should notice improved performance, especially in bass-heavy music.
How to Wire Capacitors in Parallel
Wiring capacitors in parallel is a common practice to increase the total capacitance in an electrical circuit.
Here’s a step-by-step guide on how to wire capacitors in parallel:
Gather Capacitors: Collect the capacitors you intend to wire in parallel. Ensure they have the same capacitance value and voltage rating for optimal performance.
Identify Leads: Before wiring, identify the positive (+) and negative (-) leads of each capacitor. The leads are usually marked or indicated by the longer lead being positive and the shorter one being negative.
Prepare Leads: Trim the leads of the capacitors to a suitable length for wiring. This step ensures easier and cleaner connections.
Connect Positive Leads: Connect all the positive (+) leads of the capacitors together. You can do this by soldering or using a wire connector. Ensure a secure and tight connection to minimize resistance.
Connect Negative Leads: Similarly, connect all the negative (-) leads of the capacitors together. Again, ensure a secure connection to prevent any loose connections or short circuits.
Insulate Connections: Once all the leads are connected, insulate the connections using electrical tape or heat shrink tubing. This step helps prevent accidental short circuits and ensures safety.
Verify Polarity: Double-check the polarity of the capacitors to ensure they are connected correctly. The positive terminals should be connected together, and the negative terminals should be connected together.
Test Capacitance: After wiring in parallel, you can verify the total capacitance by measuring it with a multimeter. The total capacitance of the parallel combination is the sum of the individual capacitances of each capacitor.
How to Wire 2 Capacitors Together
Wiring two capacitors together can be done in two primary configurations: series and parallel. Let’s explore both methods:
Wiring Capacitors in Series:
- Gather Capacitors: Collect two capacitors with matching capacitance values and voltage ratings.
- Identify Leads: Determine the positive (+) and negative (-) leads of each capacitor. Typically, the longer lead denotes the positive terminal.
- Connect Positive to Negative: Link the positive (+) terminal of one capacitor to the negative (-) terminal of the other. This forms a series connection between the capacitors.
- Measure Total Voltage: The total voltage across the series-connected capacitors equals the sum of their individual voltages. Ensure this total voltage does not exceed the capacitors’ voltage rating.
- Insulate Connections: To prevent short circuits, insulate the joint between the capacitors using electrical tape or heat shrink tubing.
Wiring Capacitors in Parallel:
- Gather Capacitors: Obtain two capacitors with identical capacitance values and voltage ratings.
- Identify Leads: Identify the positive (+) and negative (-) leads of each capacitor.
- Connect Positive Leads: Link both capacitors’ positive (+) terminals. Ensure a secure connection, either by soldering or using a wire connector.
- Connect Negative Leads Together: Similarly, connect the negative (-) terminals of both capacitors. Guarantee a tight connection to avoid any loose connections.
- Measure Total Capacitance: The total capacitance of the parallel combination equals the sum of the individual capacitances of each capacitor. Use a multimeter to verify this total capacitance.
- Insulate Connections: After connecting the capacitors, insulate the connections to prevent short circuits and ensure safety.
By following these steps, you can successfully wire two capacitors together, whether in series or parallel, depending on your circuit’s requirements. Each configuration offers distinct electrical characteristics suitable for various applications.
How to Wire a Start Capacitor to a Compressor
Wiring a start capacitor to a compressor is a crucial step in ensuring the efficient operation of the compressor motor. Here’s a detailed guide on how to wire a start capacitor to a compressor:
Step 1: Gather Materials
- Start Capacitor: Ensure you have a start capacitor suitable for your compressor motor’s specifications.
- Screwdriver: You’ll need a screwdriver to access and secure connections.
- Insulating Materials: Have electrical tape or heat shrink tubing ready to insulate connections.
Step 2: Safety Precautions
- Power Off: Before starting any work, make sure the compressor is powered off and disconnected from any power source to avoid electric shock.
Step 3: Locate Motor Connections
- Access Terminal Box: Open the terminal box of the compressor motor to access the wiring connections.
- Identify Start Terminal: Locate the start terminal on the motor. It’s typically labeled as “S” or “Start.”
Step 4: Connect Start Capacitor
- Connect to Start Terminal: Connect one lead of the start capacitor to the start terminal of the compressor motor.
- Secure Connection: Ensure the connection is tight and secure to prevent any loose connections during operation.
Step 5: Insulate Connections
- Use Insulating Material: Once the capacitor is connected, insulate the connection using electrical tape or heat shrink tubing. This prevents short circuits and ensures safety.
Step 6: Verify Wiring
- Double-Check Connections: Before closing the terminal box, double-check all connections to ensure they are correct and secure.
Step 7: Power On and Test
- Power On: After confirming all connections, power on the compressor and test its operation.
- Observe Startup: Monitor the compressor’s startup to ensure it starts smoothly and without any issues.
Step 8: Final Inspection
- Check for Heating: After initial operation, check the start capacitor for any signs of overheating or abnormal behavior.
- Reinspect Connections: Periodically inspect the wiring connections to ensure they remain tight and secure.
By following these steps, you can effectively wire a start capacitor to a compressor, facilitating smooth motor startup and efficient operation. Always prioritize safety and double-check connections to avoid any potential issues.
Testing and Troubleshooting
Capacitance Verification
Use a multimeter to measure the capacitance of the wired capacitor and verify it matches the specified value.
Functionality Test
After wiring, power on the circuit and conduct a functionality test to ensure the capacitor operates correctly within the circuit.
Troubleshooting
If the circuit fails to function properly, troubleshoot potential issues such as loose connections, reversed polarity, or damaged components.
FAQs
How do I determine the polarity of a capacitor?
The polarity of a capacitor is indicated by the longer lead, which is the positive terminal, and the shorter lead, which is the negative terminal.
Can I use any capacitor for my circuit?
It’s essential to select capacitors with the appropriate capacitance and voltage ratings for your circuit to ensure optimal performance and safety.
What happens if I connect a capacitor backward?
Connecting a capacitor backward can damage the component or cause it to fail. Always double-check polarity before making connections.
How do I discharge a capacitor safely?
To discharge a capacitor safely, use a discharge tool or resistor to drain the stored electrical charge gradually.
Can I reuse capacitors from old electronic devices?
While it’s possible to reuse capacitors, ensure they are in good condition and match the specifications required for your project.
What are the common applications of capacitors?
Capacitors find applications in various electronic devices and circuits, including power supplies, audio amplifiers, timing circuits, and filters.
How do you wire a capacitor?
Follow the wiring diagram specific to the capacitor type. Identify terminals like “Common,” “Fan,” or “Herm” for AC capacitors and connect appropriately using the color-coded wires.
How to wire a 2-wire capacitor?
Connect the two terminals to the motor’s power and winding, ensuring correct polarity if required. Reference the 2-wire capacitor wiring diagram.
How to wire a hard start capacitor?
Install the capacitor in parallel with the motor start circuit. Use its two leads to connect to the “Start” and “Run” terminals on the motor or compressor.
Can a capacitor be wired backward?
Polarized capacitors cannot be wired backward, as this may cause damage or failure. Non-polarized capacitors can function either way in AC circuits.
Conclusion
Wiring a capacitor is a fundamental skill for electronics enthusiasts and professionals alike. You can effectively wire capacitors for a wide range of applications by following proper procedures and safety measures. Remember to prioritize safety, verify connections, and troubleshoot any issues to ensure optimal performance of your circuits.
Ready to take your electrical projects to the next level? Learn how to wire a capacitor like a pro and unlock a world of possibilities in electronics! Whether you’re a DIY enthusiast or a professional electrician, mastering capacitor wiring is essential for various applications. Dive into our comprehensive guide and start wiring with confidence today!