Understanding how to read a circuit breaker is crucial for both homeowners and professionals in the electrical field. Circuit breakers act as the first line of defense against electrical overloads and faults, ensuring the safety of electrical systems.
In this guide, we will delve into the intricacies of circuit breakers, from their types and classifications to their diagnostic methods and preventive measures.
How to Read a Circuit Breaker
Reading a circuit breaker involves understanding its different components and interpreting the information it provides. Here’s a more detailed explanation:
Identification: Begin by locating the circuit breaker panel in your home or building. Each circuit breaker is typically labeled to indicate which area or appliance it controls.
Visual Inspection: Take a close look at the circuit breaker panel. Check for any signs of damage, such as cracks, burn marks, or corrosion. These could indicate potential issues with the breaker.
Tripped Breakers: If a circuit breaker has tripped, it will be in the “off” position, usually positioned between the “on” and “off” markings. A tripped breaker is a safety feature that shuts off power to a circuit when it detects an overload or fault.
Resetting: To reset a tripped breaker, first, switch it to the “off” position and then back to the “on” position. However, it’s essential to identify and address the cause of the trip before resetting to prevent it from happening again.
Rating: Each circuit breaker has a rating, typically expressed in amps. This rating indicates the maximum current the breaker can handle before tripping. Make sure not to exceed this limit to prevent overloading the circuit.
Test Buttons: Some circuit breakers, such as GFCIs and AFCIs, have test buttons for periodic testing. Pressing these buttons should trip the breaker, indicating that it is functioning correctly.
Labeling: Properly labeling circuit breakers can help identify which breaker controls which area or appliance in your home. If the panel is not adequately labeled, consider creating a comprehensive labeling system for easy reference.
Understanding Trips: Different types of trips, such as overload, short circuit, and ground fault, can cause a circuit breaker to trip. Understanding the cause of the trip can help diagnose underlying electrical issues.
Consultation: If you’re unsure about how to read or interpret a circuit breaker, or if you encounter recurring trips, it’s best to consult with a qualified electrician. They can perform a thorough inspection and provide expert advice on troubleshooting and repairs.
By familiarizing yourself with these aspects of reading a circuit breaker, you can better understand its function and ensure the safety and reliability of your electrical system.
How to Read Circuit Breaker Labels
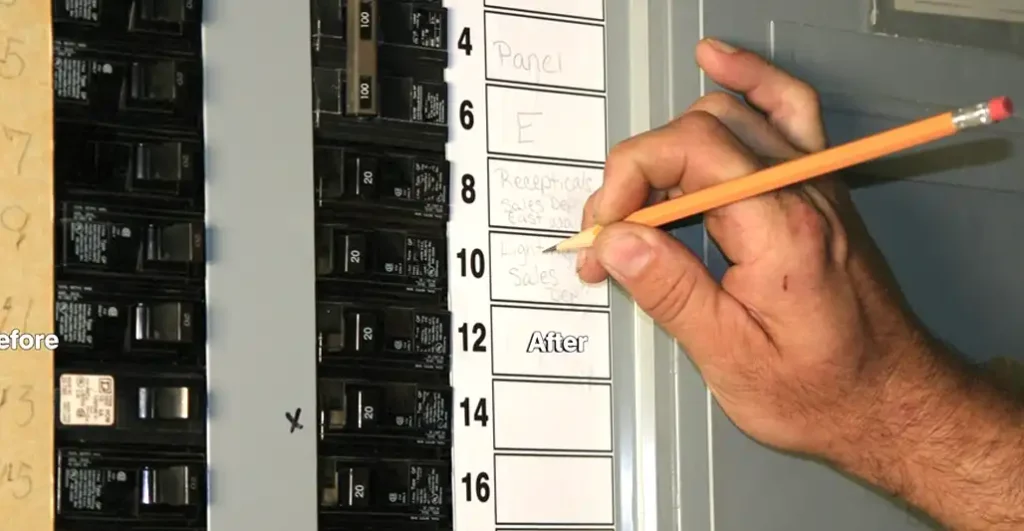
Reading circuit breaker labels is essential for identifying which breaker controls which area or appliance in your home or building.
Here’s a step-by-step guide on how to read circuit breaker labels:
- Locate the Circuit Breaker Panel: Find the circuit breaker panel in your home or building. It is usually installed in a utility room, garage, basement, or another easily accessible area.
- Inspect the Labels: Each circuit breaker in the panel should have a label indicating its corresponding area or appliance. These labels are typically located next to or above each breaker switch.
- Identify the Labeling System: Some circuit breaker panels have a standard labeling system, while others may have customized labels. Look for alphanumeric codes or descriptions that provide information about the circuits.
- Match Labels to Areas or Appliances: Carefully read each label and match it to the corresponding area or appliance in your home. Common labels may include “kitchen lights,” “living room outlets,” “bedroom 1,” “washer,” “dryer,” etc.
- Use Descriptive Labels: Labels should be descriptive and easy to understand. Avoid vague or ambiguous labels that could lead to confusion during electrical work or emergencies.
- Create Additional Labels if Needed: If the circuit breaker panel is not adequately labeled, consider creating additional labels for better organization and clarity. Use a label maker or adhesive labels for this purpose.
- Update Labels as Needed: Over time, changes may occur in your electrical system, such as renovations or new installations. Update circuit breaker labels accordingly to reflect these changes accurately.
- Consider Color Coding: For added convenience, you may choose to color-code circuit breaker labels to visually distinguish between different circuits or types of appliances.
- Consult a Professional if Unsure: If you’re unsure about how to read or interpret circuit breaker labels, or if you encounter any discrepancies, it’s best to consult with a qualified electrician. They can help you understand the labeling system and ensure the safety of your electrical system.
By following these steps, you can effectively read circuit breaker labels and better manage your electrical system. Proper labeling helps prevent confusion and ensures quick identification of circuits during maintenance or emergencies.
How to Read Circuit Breaker Specifications
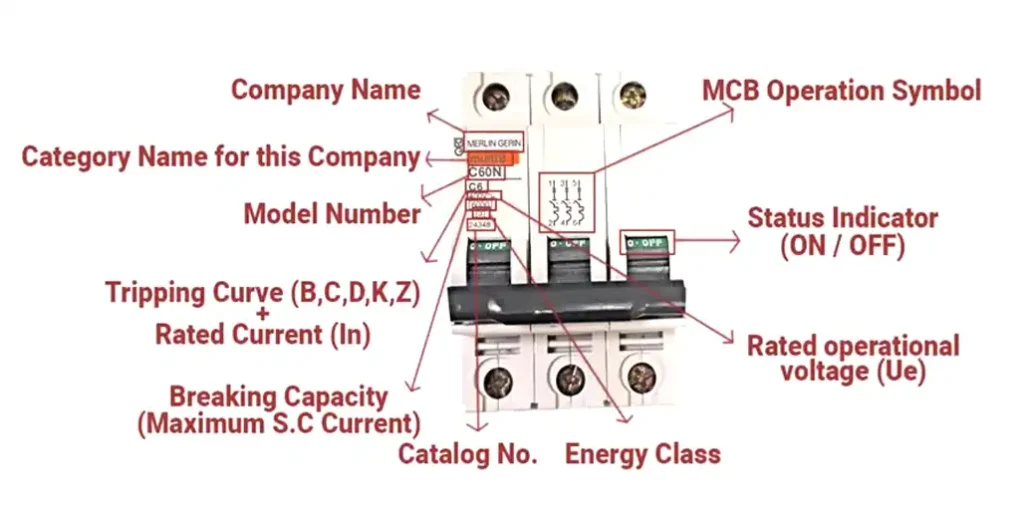
Understanding circuit breaker specifications is crucial for ensuring that you select the right breaker for your electrical system and for safe operation. Here’s a guide on how to read and interpret the specifications of a circuit breaker:
1. Voltage Rating
The voltage rating indicates the maximum voltage the circuit breaker can handle safely. It’s usually marked on the breaker itself and can be found in the product documentation.
- Example: 120/240V AC for residential breakers, or higher for industrial applications.
2. Current Rating (Amperage)
The current rating specifies the maximum current the breaker can carry without tripping. This is typically indicated in amperes (A).
- Example: 15A, 20A, 30A.
3. Interrupting Capacity (IC) or Short-Circuit Current Rating (SCCR)
This rating indicates the maximum fault current the breaker can interrupt without damage. It’s an important specification for safety in case of a short circuit.
- Example: 10,000 AIC (Ampere Interrupting Capacity).
4. Type and Function
Circuit breakers come in various types, each with specific functions:
- Standard Circuit Breakers: For general use in residential and commercial applications.
- Ground Fault Circuit Interrupters (GFCIs): Protect against electrical shock by detecting ground faults.
- Arc Fault Circuit Interrupters (AFCIs): Protect against electrical fires by detecting arcing faults.
- Dual Function Breakers: Combine GFCI and AFCI protection.
5. Trip Curve
The trip curve shows how the breaker responds to overcurrents over time. Different types of breakers have different trip curves (B, C, D curves):
- B Curve: Trips between 3-5 times full load current (common for residential use).
- C Curve: Trips between 5-10 times full load current (suitable for commercial and light industrial use).
- D Curve: Trips between 10-20 times full load current (for equipment with high inrush currents).
6. Frame Size
The frame size defines the physical dimensions and maximum capacity of the breaker. It’s essential for fitting into the designated panel or enclosure.
- Example: A specific frame size like 100AF (Ampere Frame) might house breakers rated from 15A to 100A.
7. Mounting Type
The mounting type specifies how the breaker is installed in the panel:
- Plug-in: Common for residential panels.
- Bolt-on: Used in commercial and industrial panels for a more secure connection.
8. Poles
The number of poles indicates how many separate circuits the breaker can control:
- Single-Pole: Controls one circuit, typically for 120V circuits.
- Double-Pole: Controls two circuits or one 240V circuit.
- Three-Pole: Used in three-phase systems.
9. Manufacturer and Model Number
Always note the manufacturer and specific model number, which can be critical for obtaining compatible replacements or additional breakers for your panel.
10. Additional Features
Some breakers come with extra features, such as:
- Indicators: Visual indicators showing whether the breaker is on, off, or tripped.
- Remote Monitoring: Capability to monitor breaker status remotely.
- Adjustable Trip Settings: Allows customization of the trip settings for specific needs.
Practical Example of Reading Specifications
Imagine you have a circuit breaker with the following specifications:
- Voltage Rating: 120/240V AC
- Current Rating: 20A
- Interrupting Capacity: 10,000 AIC
- Type: GFCI
- Trip Curve: B Curve
- Frame Size: 100AF
- Mounting Type: Plug-in
- Poles: Single-Pole
- Manufacturer: Square D
- Model Number: QO120GFI
Interpretation:
- This is a 20-amp breaker that can handle up to 240 volts.
- It can safely interrupt up to 10,000 amps of fault current.
- It’s a GFCI type, offering protection against ground faults.
- The B Curve indicates it’s suitable for residential use, tripping between 3-5 times the rated current.
- The frame size is standard for residential panels.
- It’s a plug-in type, making installation straightforward.
- It’s a single-pole breaker, controlling one circuit.
- The manufacturer is Square D, and the specific model is QO120GFI, ensuring compatibility with QO panels.
Understanding these specifications helps ensure you choose the right breaker for your needs and maintain the safety and efficiency of your electrical system.
How to Read Circuit Breaker Time Current Curves

Reading circuit breaker time-current curves is essential for understanding how a circuit breaker will respond to different levels of overcurrent over time. These curves help in selecting the appropriate circuit breaker for specific applications and ensuring proper protection of electrical circuits.
Here’s a step-by-step guide on how to read and interpret these curves:
1. Understanding the Axes
- Horizontal Axis (X-Axis): Represents the current, typically expressed as a multiple of the circuit breaker’s rated current (e.g., 1x, 2x, 10x the rated current). It is usually plotted on a logarithmic scale.
- Vertical Axis (Y-Axis): Represents the time, typically in seconds, and is also plotted on a logarithmic scale. This shows how long it takes for the circuit breaker to trip at different current levels.
2. Curve Regions
Time-current curves usually consist of several regions:
- Long-Time Delay (LTD) Region: Indicates the breaker’s response to small overcurrents over long periods. This part of the curve shows how the breaker handles sustained overload conditions.
- Short-Time Delay (STD) Region: Shows the breaker’s response to larger overcurrents over shorter periods. This is crucial for determining the breaker’s ability to handle temporary surges without tripping.
- Instantaneous Trip (IT) Region: Reflects the breaker’s response to very high current levels in an almost instantaneous manner. This part of the curve is critical for short-circuit protection.
3. Interpreting the Curve
- Nominal Current (In): The current rating of the breaker. For example, if the breaker is rated at 100A, the nominal current is 100A.
- Multiplier: The current values on the X-axis are often multiples of the nominal current. For instance, a point at 10 on the X-axis for a 100A breaker represents 1000A.
- Time Values: Points on the curve indicate the maximum time the breaker will allow a certain multiple of its rated current to flow before tripping.
4. Reading Specific Points
To read a specific point on the curve:
- Identify the Current Multiple: Locate the multiple of the rated current on the X-axis.
- Find the Corresponding Time: Move vertically from this point to intersect the curve, then move horizontally to the Y-axis to find the time value.
- Interpret the Result: This time value indicates how long the breaker will take to trip at that current level.
5. Example
Consider a circuit breaker with a nominal current of 100A:
- At 3x In (300A):
- Locate 3 on the X-axis.
- Move vertically to the curve.
- If the intersection point corresponds to 10 seconds on the Y-axis, it means the breaker will trip within 10 seconds if 300A is flowing through it.
- At 10x In (1000A):
- Locate 10 on the X-axis.
- Move vertically to the curve.
- If the intersection point corresponds to 0.1 seconds on the Y-axis, it means the breaker will trip within 0.1 seconds if 1000A is flowing through it.
6. Applications of the Curve
- Coordination: Ensure that upstream and downstream breakers are coordinated so that the breaker closest to the fault trips first.
- Safety: Confirm that the breaker trips quickly enough to prevent damage to equipment and wiring.
- System Design: Aid in the design of electrical systems by selecting breakers with appropriate time-current characteristics for specific loads and fault conditions.
7. Curve Variations
Different types of breakers have different curves:
- Thermal-Magnetic Breakers: Have curves that show delayed tripping for lower overcurrents and instantaneous tripping for high overcurrents.
- Electronic Breakers: May have adjustable trip settings and more precise curves for specific applications.
8. Manufacturer’s Data
Always refer to the manufacturer’s specific time-current curves for accurate information. These curves are usually provided in the technical documentation and should be used for precise design and troubleshooting.
Conclusion
Understanding how to read a circuit breaker, from interpreting its labels and specifications to analyzing its time-current curves, is essential for ensuring the safety and efficiency of any electrical system. Proper knowledge in this area enables homeowners and professionals alike to maintain and troubleshoot electrical circuits effectively.
Key Takeaways
- Identification and Labeling: Properly labeled circuit breakers facilitate quick identification and can significantly simplify maintenance and troubleshooting.
- Specifications: Knowing how to read the voltage, current rating, interrupting capacity, and other specifications of a circuit breaker ensures that you select the appropriate breaker for your needs.
- Time-Current Curves: These curves provide crucial information on how a breaker will respond to different levels of overcurrent over time, helping in selecting and coordinating breakers for optimal protection.
- Safety: Understanding the detailed functioning and specifications of circuit breakers is fundamental in preventing electrical hazards, ensuring that the breakers operate correctly and protect the system as intended.
By familiarizing yourself with these aspects, you can confidently manage your electrical system, ensuring safety, reliability, and efficiency. Whether for residential, commercial, or industrial applications, the principles outlined in this guide will help you navigate the complexities of circuit breakers effectively.