Adding a new circuit breaker to your electrical panel is a common home improvement project that can provide additional power for your appliances and devices. However, it’s essential to approach this task with caution and follow safety guidelines to prevent electrical hazards.
In this blog, we’ll guide you through the process of adding a circuit breaker, step-by-step. We’ll cover the necessary tools, materials, and safety precautions to ensure a successful installation. Whether you’re a DIY enthusiast or planning to hire a professional, this information will be valuable.
Let’s get started on your home improvement journey!
What Is Circuit Breaker
A circuit breaker is a safety device used in electrical systems to protect circuits from excessive current. When a circuit breaker detects an overload or short circuit, it automatically interrupts the flow of electricity, preventing potential fires or damage to equipment.
Think of a circuit breaker as a safety switch. It’s designed to trip or open when the current flowing through a circuit exceeds a predetermined limit. This prevents the circuit from becoming overloaded and potentially causing a fire.
There are different types of circuit breakers, each with its own specific operating mechanism. Some use magnetic forces, while others rely on thermal principles.
In essence, circuit breakers are essential components of electrical systems that ensure safety and prevent damage.
How to Add Circuit Breaker

Disclaimer: Electrical work can be dangerous. If you’re unsure about your abilities, it’s highly recommended to consult a qualified electrician.
Tools and Materials:
- Voltage tester
- Screwdriver
- Wire cutters/strippers
- Electrical tape
- New circuit breaker
- Appropriate gauge wire
Steps about adding circuit breaker to panel
- Safety First:
- Turn off the main breaker: This will de-energize the entire electrical system.
- Use a voltage tester: Verify that the circuit you’re working on is dead.
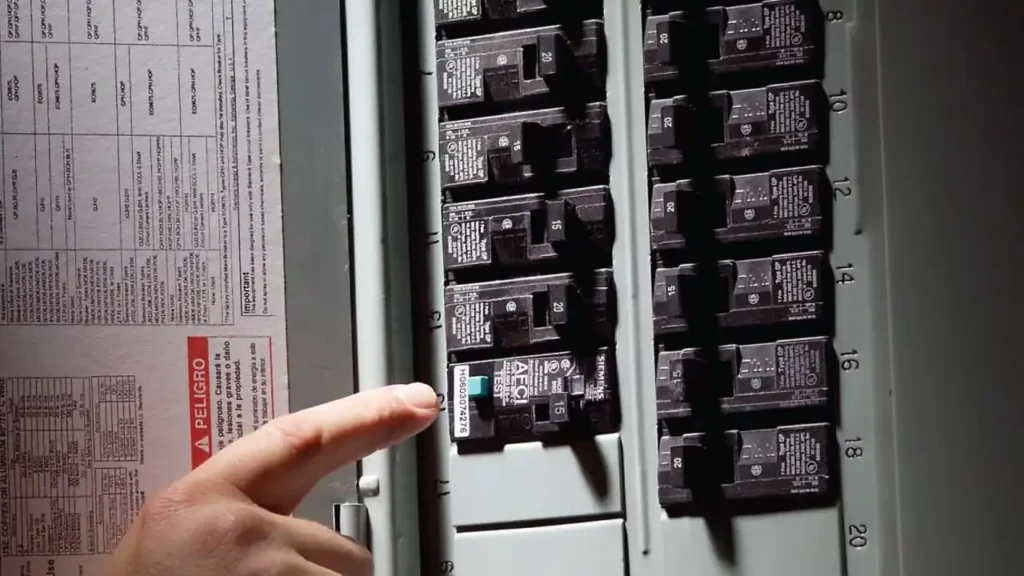
- Identify the Panel:
- Locate the distribution panel: This is usually found in the basement or garage.
- Assess the Panel:
- Check for space: Ensure there’s an empty slot in the panel for the new breaker.
- Determine the appropriate amperage: Choose a breaker that matches the load requirements of the circuit you’re adding.
- Prepare the Wire:
- Cut and strip the wire: Cut a length of wire of the appropriate gauge and strip the ends.
- Connect the Wire:
- Attach the wire to the breaker: Connect the hot, neutral, and ground wires to the corresponding terminals on the new breaker.
- Secure the connections: Tighten the screws to ensure a secure connection.
- Install the Breaker:
- Snap the breaker into place: Slide the breaker into the empty slot in the panel and snap it securely.
- Restore Power:
- Turn on the main breaker: This will re-energize the system.
- Test the circuit: Plug a device into the outlet controlled by the new breaker to verify that it’s working.
Remember:
- Follow electrical codes: Ensure your work complies with local electrical regulations.
- Label the circuit: Clearly label the new circuit for future reference.
- Seek professional help: If you’re unsure about any step or encounter difficulties, consult a qualified electrician.
By following these steps and prioritizing safety, you can successfully add a new circuit breaker to your electrical system.
How to Add a 30 Amp Circuit Breaker
Disclaimer: Electrical work can be dangerous. If you’re unsure about your abilities, it’s highly recommended to consult a qualified electrician.
Tools and Materials:
- Voltage tester
- Screwdriver
- Wire cutters/strippers
- Electrical tape
- 30 amp circuit breaker
- #10 gauge wire (or appropriate gauge based on local codes)
- Wire nuts
Steps:
- Safety First:
- Turn off the main breaker: This will de-energize the entire electrical system.
- Use a voltage tester: Verify that the circuit you’re working on is dead.
- Identify the Panel:
- Locate the distribution panel: This is usually found in the basement or garage.
- Assess the Panel:
- Check for space: Ensure there’s an empty slot in the panel for the new breaker.
- Determine the appropriate amperage: Verify that your electrical service can handle a 30 amp circuit.
- Prepare the Wire:
- Cut and strip the wire: Cut a length of #10 gauge wire (or appropriate gauge based on local codes) and strip the ends.
- Connect the Wire:
- Attach the wire to the breaker: Connect the hot, neutral, and ground wires to the corresponding terminals on the 30 amp breaker.
- Secure the connections: Tighten the screws to ensure a secure connection.
- Install the Breaker:
- Snap the breaker into place: Slide the breaker into the empty slot in the panel and snap it securely.
- Run the Circuit:
- Run the wire: Run the wire from the breaker to the desired location for the new outlet or fixture.
- Install the outlet or fixture: Connect the wire to the outlet or fixture according to the manufacturer‘s instructions.
- Restore Power:
- Turn on the main breaker: This will re-energize the system.
- Test the circuit: Plug a device into the new outlet to verify that it’s working.
Remember:
- Follow electrical codes: Ensure your work complies with local electrical regulations.
- Label the circuit: Clearly label the new circuit for future reference.
- Seek professional help: If you’re unsure about any step or encounter difficulties, consult a qualified electrician.
By following these steps and prioritizing safety, you can successfully add a 30 amp circuit breaker to your electrical system.
How to Add a Circuit to a Breaker Box

Disclaimer: Electrical work can be dangerous. If you’re unsure about your abilities, it’s highly recommended to consult a qualified electrician.
Tools and Materials:
- Voltage tester
- Screwdriver
- Wire cutters/strippers
- Electrical tape
- New circuit breaker
- Appropriate gauge wire
Steps:
- Safety First:
- Turn off the main breaker: This will de-energize the entire electrical system.
- Use a voltage tester: Verify that the circuit you’re working on is dead.
- Identify the Panel:
- Locate the distribution panel: This is usually found in the basement or garage.
- Assess the Panel:
- Check for space: Ensure there’s an empty slot in the panel for the new breaker.
- Determine the appropriate amperage: Choose a breaker that matches the load requirements of the circuit you’re adding.
- Prepare the Wire:
- Cut and strip the wire: Cut a length of wire of the appropriate gauge and strip the ends.
- Connect the Wire:
- Attach the wire to the breaker: Connect the hot, neutral, and ground wires to the corresponding terminals on the new breaker.
- Secure the connections: Tighten the screws to ensure a secure connection.
- Install the Breaker:
- Snap the breaker into place: Slide the breaker into the empty slot in the panel and snap it securely.
- Restore Power:
- Turn on the main breaker: This will re-energize the system.
- Test the circuit: Plug a device into the outlet controlled by the new breaker to verify that it’s working.
Remember:
- Follow electrical codes: Ensure your work complies with local electrical regulations.
- Label the circuit: Clearly label the new circuit for future reference.
- Seek professional help: If you’re unsure about any step or encounter difficulties, consult a qualified electrician.
By following these steps and prioritizing safety, you can successfully add a new circuit to your electrical system.
Would you like to know more about specific electrical codes or troubleshooting tips?
How to Add a Circuit Breaker to an Existing Box
Disclaimer: Electrical work can be dangerous. If you’re unsure about your abilities, it’s highly recommended to consult a qualified electrician.
Tools and Materials:
- Voltage tester
- Screwdriver
- Wire cutters/strippers
- Electrical tape
- New circuit breaker
- Appropriate gauge wire
Steps:
- Safety First:
- Turn off the main breaker: This will de-energize the entire electrical system.
- Use a voltage tester: Verify that the circuit you’re working on is dead.
- Identify the Panel:
- Locate the distribution panel: This is usually found in the basement or garage.
- Assess the Panel:
- Check for space: Ensure there’s an empty slot in the panel for the new breaker.
- Determine the appropriate amperage: Choose a breaker that matches the load requirements of the circuit you’re adding.
- Prepare the Wire:
- Cut and strip the wire: Cut a length of wire of the appropriate gauge and strip the ends.
- Connect the Wire:
- Attach the wire to the breaker: Connect the hot, neutral, and ground wires to the corresponding terminals on the new breaker.
- Secure the connections: Tighten the screws to ensure a secure connection.
- Install the Breaker:
- Snap the breaker into place: Slide the breaker into the empty slot in the panel and snap it securely.
- Restore Power:
- Turn on the main breaker: This will re-energize the system.
- Test the circuit: Plug a device into the outlet controlled by the new breaker to verify that it’s working.
Remember:
- Follow electrical codes: Ensure your work complies with local electrical regulations.
- Label the circuit: Clearly label the new circuit for future reference.
- Seek professional help: If you’re unsure about any step or encounter difficulties, consult a qualified electrician.
By following these steps and prioritizing safety, you can successfully add a new circuit to your electrical system.
How Much Does It Cost to Add a Circuit Breaker
The cost to add a circuit breaker can vary depending on several factors, including:
- Labor costs: The cost of hiring an electrician to install the new breaker.
- Materials: The cost of the new circuit breaker, wire, and any other necessary materials.
- Permits and inspections: If required, the cost of obtaining permits and inspections from your local authorities.
- Complexity of the installation: If the installation requires additional work, such as rewiring or upgrading the service panel, the cost will be higher.
In general, you can expect to pay anywhere from $200 to $500 or more to add a circuit breaker.
It’s important to obtain quotes from multiple electricians to compare prices and ensure you’re getting a fair deal. Additionally, consider the long-term benefits of adding a new circuit, such as increased convenience and safety.
Can You Add Another Circuit Breaker
Yes, you can typically add another circuit breaker to your electrical panel if there is space available and your electrical system can handle the additional load. However, it’s important to consult with a qualified electrician to ensure that your panel can safely accommodate the new breaker and to avoid any potential electrical hazards.
Here are some factors to consider when adding a circuit breaker:
- Space in the panel: There must be an empty slot available for the new breaker.
- Amperage: The new breaker must be rated for the appropriate amperage to handle the load of the circuit you want to add.
- Electrical service: Your electrical service must be able to handle the additional load.
- Permits and inspections: You may need to obtain permits and inspections from your local authorities.
If you’re unsure about whether you can add a circuit breaker yourself, it’s best to hire a professional electrician to assess your electrical system and complete the installation safely.
Conclusion
Adding a circuit breaker to your electrical panel can provide additional power and flexibility for your home or business. By following the step-by-step guide and prioritizing safety, you can successfully complete this project.
If you need professional assistance with circuit breaker installation or have any questions, our team of experienced electricians is ready to help. We offer reliable and affordable services tailored to your specific needs.
Contact us today for a free quote or to schedule an appointment