Welcome to our comprehensive guide on how to hook up a capacitor. Whether you’re a seasoned technician or a DIY enthusiast, understanding the intricacies of capacitor installation is crucial for various electrical applications.
In this article, we’ll walk you through the process, covering everything from basic principles to advanced techniques. So, let’s dive in and empower you with the knowledge to tackle capacitor connections confidently.
What is a Capacitor?
To begin our journey, let’s define what a capacitor is. A capacitor is an electronic component that stores and releases electrical energy. It consists of two conductive plates separated by an insulating material, known as a dielectric.
Types of Capacitors
Explore the diverse world of capacitors, including electrolytic, ceramic, tantalum, and film capacitors. Each type has its unique characteristics and applications, so understanding their differences is essential for effective usage.
Capacitor Properties
Delve into the key properties of capacitors, such as capacitance, voltage rating, and tolerance. Understanding these properties enables you to select the right capacitor for your specific requirements.
What Is Capacitor Hook Up
Capacitor hook-up refers to the process of connecting a capacitor to an electrical circuit or system. Capacitors are electronic components that store and release electrical energy, and their proper connection is crucial for the functionality and performance of various electrical devices and systems.
Safety Precautions about Capacitor Hook Up
Safety precautions are paramount when hooking up capacitors to ensure the well-being of yourself and the integrity of your electrical system.
Here are some essential safety measures to consider:
- Electrical Safety: Before handling capacitors, always turn off the power supply and ensure that the circuit is de-energized. Capacitors store electrical energy and can discharge unexpectedly, leading to severe shocks or injuries.
- Personal Protective Equipment (PPE): Wear appropriate PPE, including insulated gloves, safety goggles, and non-conductive footwear, to protect yourself from electrical hazards. PPE helps minimize the risk of electrical shocks or burns during capacitor installation.
- Discharging Capacitors: Capacitors can retain a charge even after the power is disconnected, posing a potential hazard. Before handling capacitors, discharge them using a discharge resistor or by short-circuiting the terminals with a well-insulated tool. This prevents accidental shocks and ensures safe handling.
- Handling Capacitors Safely: Handle capacitors with care to avoid physical damage or exposure to extreme conditions. Capacitors should be stored in a dry, cool environment away from direct sunlight and moisture. Avoid bending, dropping, or subjecting capacitors to excessive force, as this can compromise their integrity and performance.
- Avoiding Overheating: During soldering or installation, avoid overheating capacitors, as excessive heat can damage the internal components or lead to thermal runaway. Use a soldering iron with the appropriate temperature setting and ensure proper ventilation to dissipate heat effectively.
- Proper Installation: Follow manufacturer guidelines and wiring diagrams for proper capacitor installation. Ensure that connections are secure and free from any loose wires or components. Double-check the orientation of the capacitor terminals to prevent reverse polarity, which can damage the capacitor and associated circuitry.
- Testing and Inspection: After installation, perform thorough testing and inspection to verify capacitor performance and integrity. Use testing equipment such as capacitance meters or oscilloscopes to ensure that capacitors meet the required specifications and perform as expected.
By adhering to these safety precautions, you can minimize the risk of accidents and ensure a safe and successful capacitor hook-up process. Always prioritize safety and consult with professionals if you have any doubts or concerns regarding capacitor installation or handling.
Tools and Equipment
Essential Tools
Discover the essential tools required for capacitor installation, such as wire strippers, soldering iron, and multimeter. Having the right tools on hand simplifies the installation process and ensures accuracy.
Testing Equipment
Explore testing equipment like capacitance meters and oscilloscopes, which are invaluable for troubleshooting and verifying capacitor performance.
Additional Accessories
Consider additional accessories such as mounting hardware, heat shrink tubing, and terminal connectors to facilitate capacitor installation and ensure reliability.
Capacitor Installation
Installing a capacitor requires careful attention to detail and adherence to proper procedures to ensure optimal performance and safety.
Here’s a step-by-step guide on how to install a capacitor:
Preparation:
Gather all the necessary tools and equipment, including the capacitor, wire strippers, soldering iron (if needed), and safety gear such as insulated gloves and safety goggles.
Ensure that the power source to the circuit or device where the capacitor will be installed is turned off and disconnected to prevent electrical shocks or accidents.
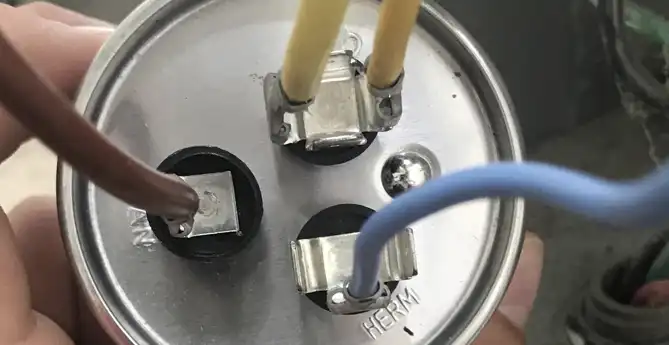
Identify Capacitor Terminals:
Examine the capacitor to identify its terminals. Capacitors typically have two terminals: positive (+) and negative (-), although some may be labeled differently based on their construction.
Prepare Connections:
If necessary, strip the insulation from the ends of the wires that will be connected to the capacitor terminals using wire strippers. Ensure that the exposed wire ends are clean and free from any debris or oxidation.
Connect the Capacitor:
Determine the correct polarity of the capacitor terminals based on its markings or labels. Connect the positive (+) terminal of the capacitor to the positive (+) terminal of the circuit or device and the negative (-) terminal to the negative (-) terminal.
Use soldering techniques if soldering is required for the connection. Apply solder to the joint to create a secure and reliable bond between the capacitor terminal and the wire or component.
Secure Mounting:
Once the capacitor is connected, ensure that it is securely mounted or positioned within the electrical enclosure or device. Use mounting hardware or adhesive as needed to prevent the capacitor from moving or shifting during operation.
Test and Inspect:
After installation, perform testing and inspection to verify the functionality and performance of the capacitor. Use testing equipment such as capacitance meters or oscilloscopes to measure capacitance values and ensure that the capacitor meets the required specifications.
Safety Precautions:
Throughout the installation process, prioritize safety by following electrical safety protocols and wearing appropriate personal protective equipment (PPE) such as insulated gloves and safety goggles.
Avoid touching exposed metal parts of the circuit or device while working to prevent electrical shocks.
By following these steps and safety precautions, you can effectively install a capacitor in your electrical system or device with confidence. Always refer to manufacturer guidelines and specifications for specific installation requirements and recommendations.
How to Hook Up a Capacitor
Certainly! When it comes to hooking up a capacitor, it’s essential to follow a systematic approach to ensure proper installation and functionality.
Let’s delve deeper into the process:
Preparation:
Before you begin, gather all the necessary tools and equipment, including the capacitor itself, wire strippers, soldering iron, and safety gear. Ensure that the power source is disconnected to prevent electrical accidents.
Identifying Capacitor Terminals:
Capacitors typically have two terminals: positive (+) and negative (-). It’s crucial to identify these terminals correctly to ensure proper orientation during installation.
Soldering Techniques:
If your capacitor requires soldering for connection, master proper soldering techniques. This involves heating the soldering iron, applying solder to the joint, and creating a secure bond between the capacitor terminal and the wire or component.
Mounting Options:
Depending on your application, capacitors can be mounted in various ways, such as PCB mounting, chassis mounting, or surface mounting. Choose the mounting option that best suits your requirements and ensures stability.
Step-by-Step Guide:
Follow a step-by-step guide for capacitor installation, starting from preparing the capacitor and identifying terminals to making connections and securing the capacitor in place. Ensure that all connections are secure and free from any loose wires or components.
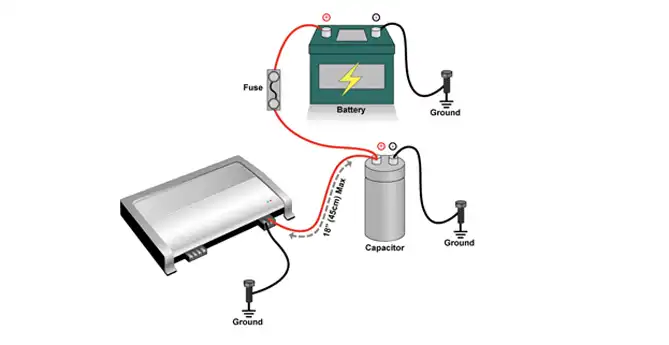
Wiring Diagrams:
Refer to wiring diagrams if available, as they provide visual guidance on how to connect the capacitor in different configurations. These diagrams can help you understand the connection process more effectively and ensure accuracy.
Tips and Tricks: Benefit from expert tips and tricks for optimizing capacitor performance and longevity. These may include recommendations for selecting the right capacitor for your application, preventing overheating, or minimizing electromagnetic interference.
By following these steps and guidelines, you can effectively hook up a capacitor for various electrical applications. Remember to prioritize safety throughout the process and consult with professionals or resources if you encounter any difficulties or uncertainties.
Common FAQs
How do I determine the capacitance rating for my application?
To determine the capacitance rating, consider factors such as the desired voltage, frequency, and circuit impedance. You can use online calculators or consult with a knowledgeable technician for assistance.
Can I connect capacitors in parallel or series?
Yes, capacitors can be connected in parallel or series to achieve specific capacitance values or voltage ratings. However, ensure that the total capacitance and voltage ratings meet your application requirements.
What are the signs of a faulty capacitor?
Signs of a faulty capacitor include bulging or leaking electrolyte, erratic circuit behavior, and reduced capacitance. If you suspect a capacitor is faulty, it’s recommended to replace it promptly to prevent further damage to your circuit.
How do I discharge a capacitor safely?
To discharge a capacitor safely, use a discharge resistor or short-circuit the terminals with a well-insulated tool. Always exercise caution and follow proper safety procedures to avoid electrical hazards.
Can I reuse capacitors from old electronics?
While it’s possible to reuse capacitors from old electronics, it’s essential to test them thoroughly for proper functionality and integrity before reuse. Capacitors degrade over time, so ensure they meet the required specifications for your application.
What precautions should I take when storing capacitors?
When storing capacitors, keep them in a dry, cool environment away from direct sunlight and humidity. Avoid subjecting capacitors to mechanical stress or extreme temperatures, as this can affect their performance and longevity.
Conclusion
Congratulations! You’ve now gained a comprehensive understanding of how to hook up a capacitor effectively. By following the guidelines outlined in this article and prioritizing safety at every step, you can confidently tackle capacitor installations with ease. Remember to refer back to this guide whenever you encounter challenges or uncertainties in your electrical projects.