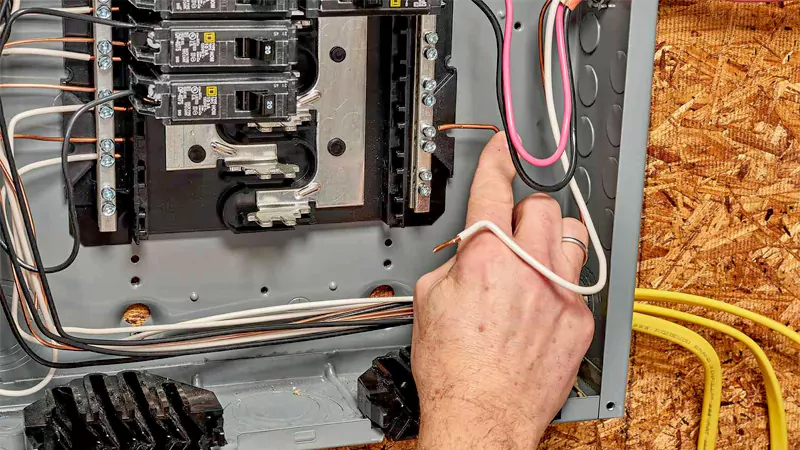
Wiring a circuit breaker box is an essential skill for both professional electricians and DIY enthusiasts. This guide will cover everything you need to know about circuit breaker box wiring, including diagrams, procedures for wiring various types of circuit breaker boxes, and tips for ensuring safety and efficiency in your electrical installations.
What is the Circuit Breaker Box
Before diving into the specifics of wiring, it’s crucial to understand the components and functions of a circuit breaker box. A circuit breaker box, also known as an electrical panel, is the central hub for your home’s electrical system. It distributes electricity from the main power source to different circuits throughout your home, protecting them from overloads and short circuits.
Components of a Circuit Breaker Box
- Main Breaker: This is the primary circuit breaker that controls the flow of electricity into the panel.
- Circuit Breakers: These are individual switches that protect different circuits in your home. They can be single-pole or double-pole breakers, depending on the voltage requirements.
- Bus Bars: Metal bars that distribute electricity to the circuit breakers.
- Neutral Bar: This bar connects all the neutral wires from different circuits.
- Ground Bar: A bar that connects all the ground wires to ensure safety.
Circuit Breaker Box Wiring Diagram
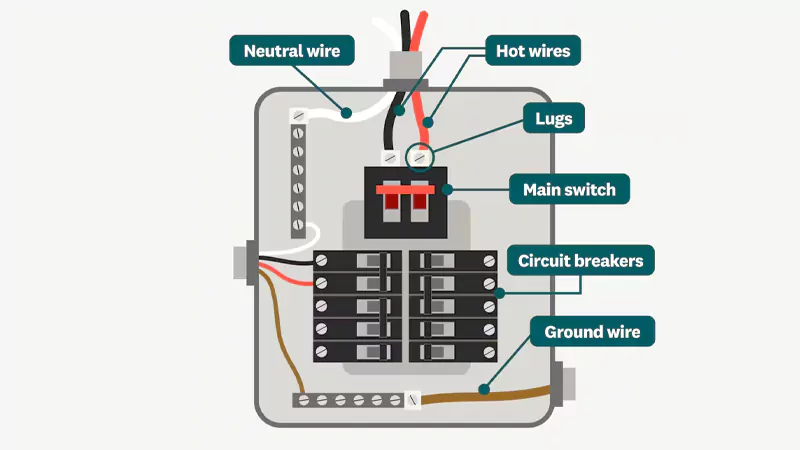
A circuit breaker box wiring diagram is essential for understanding how to wire a circuit breaker box correctly. It provides a visual representation of how the components connect and function together. Here’s a basic circuit breaker box wiring diagram:

This diagram typically includes the main power supply line, the main breaker, the circuit breakers, the neutral bar, and the ground bar, showing how each component connects.
How to Wire a Circuit Breaker Box
Wiring a circuit breaker box is a fundamental task that can significantly impact the safety and efficiency of your home’s electrical system. This process involves connecting the main power supply and distributing electricity to various circuits. Here’s an in-depth, step-by-step guide on how to wire a circuit breaker box effectively.
Step 1: Gather Tools and Materials
Before you begin, ensure you have the right tools and materials for the job. This preparation is crucial for a smooth installation process. Here’s what you’ll need:
Tools:
- Screwdriver set (both flathead and Phillips)
- Wire cutters/strippers
- Voltage tester or multimeter
- Electrical tape
Materials:
- Circuit breaker(s) (selected based on your circuit needs)
- Appropriate gauge electrical wire (based on the amperage and type of circuits)
- Electrical connectors or wire nuts
Step 2: Safety First
- Turn Off the Power: Before starting any electrical work, ensure the power is turned off at the main breaker. This is critical to prevent electric shock.
- Use a Voltage Tester: Double-check that the power is off by testing the wires in the box with a voltage tester. Confirm that no voltage is present before proceeding.
Step 3: Prepare the Circuit Breaker Box
- Mount the Box: If you’re installing a new circuit breaker box, secure it to a wall using screws or anchors. Ensure it’s mounted at a comfortable height for access.
- Remove the Cover: Take off the cover plate to access the internal components. Most circuit breaker boxes have screws or clips that hold the cover in place.
Step 4: Wiring the Main Breaker
- Connect the Main Power Supply:
- Locate the main power supply cables that will feed electricity into the circuit breaker box. These cables typically include one or two hot wires (black or red), a neutral wire (white), and a ground wire (green or bare).
- Connect the hot wires: Attach the hot wires to the terminals on the main breaker. If you have a two-pole breaker, connect each hot wire to one of the terminals. Ensure the connections are tight to avoid any loose connections that could lead to overheating.
- Connect the neutral wire: Connect the neutral wire to the neutral bus bar located in the panel. This bar is usually at the top or bottom of the box and is where all neutral wires will converge.
- Ground connection: Attach the ground wire to the ground bar in the box. If the box is metal, ensure it is properly grounded as well.

Step 5: Wiring Individual Circuit Breakers
- Determine Circuit Requirements: Identify what appliances or fixtures each circuit will supply power to. This will help you decide on the size of the circuit breaker and wire gauge needed.
- Install Circuit Breakers:
- For each new circuit, choose the appropriate circuit breaker size based on the expected load (15 amp or 20 amp are common for general circuits).
- Snap the circuit breaker into the panel’s bus bar rail. Ensure it clicks securely into place.
- Connect Hot Wires: For each circuit:
- Use the appropriate gauge wire (14 AWG for 15-amp circuits, 12 AWG for 20-amp circuits).
- Strip the ends of the hot wire (black or red) and connect it to the terminal on the circuit breaker. Tighten the screw securely to ensure a solid connection.
- Connect Neutral Wires: Take the neutral wire (typically white) from each circuit and connect it to the neutral bus bar. This is where all the neutral wires from various circuits should be terminated.
- Ground Wires: Similarly, connect the ground wire (green or bare) from each circuit to the ground bar. All ground wires from various circuits should be connected here for safety.
Step 6: Finalize and Secure Connections
- Check Connections: Go through each connection, ensuring that all wires are securely fastened. Loose connections can lead to arcing and potential electrical fires.
- Organize Wires: Neatly arrange the wires inside the breaker box to prevent interference and make future troubleshooting easier. Use cable ties or clips if necessary.
Step 7: Installing a Subpanel Circuit Breaker Box (if applicable)
If you’re adding a subpanel to your existing circuit breaker box:
- Run the Feed Wires: Use an appropriate gauge wire (typically 6 or 8 AWG, depending on the subpanel size) to connect the main panel to the subpanel.
- Connect Wires: In the subpanel, connect the hot wires to the bus bar, the neutral wire to the neutral bar, and the ground wire to the ground bar. Follow the same procedures as outlined above.
Step 8: Testing the Installation
Once everything is connected:
- Replace the Cover: Put the cover back on the circuit breaker box and secure it with screws.
- Turn the Power Back On: Switch the main breaker back on and then sequentially turn on each circuit breaker.
- Test Each Circuit: Use a voltage tester to check that each circuit is receiving power. Plug in devices or turn on lights to confirm functionality.

Common Mistakes to Avoid
- Using the Wrong Wire Gauge: Always use the correct wire gauge for the amperage of the circuit to prevent overheating and potential fire hazards.
- Inadequate Grounding: Ensure that all ground wires are properly connected to avoid electric shock and ensure the safety of the electrical system.
- Neglecting Local Codes: Always adhere to local electrical codes and regulations. If in doubt, consult a licensed electrician to ensure compliance.
Wiring a 2 Circuit Breaker Box
Wiring a 2 circuit breaker box involves a few extra considerations:
- Plan Your Circuits: Decide what each circuit will power.
- Run Wires: Use appropriate gauge wires for each circuit and connect them to the respective breakers.
- Connect Neutrals and Grounds: Ensure all neutrals and grounds are properly connected to their bars.
FAQs
How to Wire a Circuit Breaker Box for a Generator?
Wiring a circuit breaker box for a generator allows you to safely connect your generator to your home’s electrical system. Here’s how to do it:
Transfer Switch: Install a transfer switch to prevent backfeeding into the grid, which can be dangerous for utility workers.
Generator Connection: Connect the generator’s output to the transfer switch, following the manufacturer’s instructions.
Wiring to Circuit Breaker Box: Run wires from the transfer switch to the circuit breaker box. Connect them to the appropriate circuit breakers for circuits you want to power during an outage.
How to Wire a 100 Amp Circuit Breaker Box?
Wiring a 100 amp circuit breaker box is similar to wiring a standard box but requires larger gauge wire. Here’s how to do it:
Install the Box: Mount the 100 amp circuit breaker box securely.
Run the Main Supply: Use appropriate gauge wire (typically 2 AWG) for the incoming supply. Connect it to the main breaker.
Connect Ground and Neutral: Connect the ground and neutral wires to their respective bars.
Install Circuit Breakers: Install the circuit breakers according to your planned layout.
How to Rewire Circuit Breaker Box
Rewiring a circuit breaker box involves replacing old or faulty wiring. Here’s how:
Turn Off the Power: Always start by shutting off the main power.
Remove Old Wiring: Carefully disconnect the old wiring from the circuit breakers and bars.
Install New Wiring: Follow the steps outlined above to install new wires, ensuring proper connections.
Conclusion
Wiring a circuit breaker box is a crucial skill that can enhance your home’s electrical safety and functionality. Whether you’re learning how to wire a circuit breaker box for a generator, rewiring an existing box, or installing a new one, following these guidelines will help you achieve a safe and effective installation.
Always prioritize safety and consult a professional if you’re unsure about any aspect of the wiring process. By following this comprehensive guide, you can confidently tackle circuit breaker box wiring projects with ease.